Cost of Goods
WooCommerce Cost of Goods Sold allows you to easily track total profit and cost of goods by adding a Cost of Good field to simple and variable products. Costs per item and order are automatically calculated on checkout, and in-depth reports provide exactly the information you need to improve your bottom line, including information on most and least profitable sellers.
Installation
- Download the extension from your WooCommerce dashboard
- Goto Plugins > Add New > Upload and select the ZIP file you just downloaded
- Click Install Now, and then Activate
- Click the Configure link and read the next section to learn how to setup and configure the plugin.
Setup and Configuration
To start tracking your profitability, you must configure your cost settings, then set a “Cost” for any products you sell.
Extension Settings
Checkout Fees, Shipping Costs, and Taxes can be individually excluded from the profit reports by going to WooCommerce > Settings > Products > Inventory and scrolling down to “Cost of Goods Options”. By default, all of these components should be excluded from profit calculations (recommended settings).
By unchecking these boxes, profit calculations will include these fees, costs, and taxes as income, and will therefore be included in your profit. If an item costs you $3, you sell it for $10, profit is normally $7. If the tax and shipping charged to the customer amount to $3 and you include them in profit calculations, your profit will be shown as $10 instead. Only enable these options if you want shipping or taxes included in your income. Some customers include shipping, for example, since they later deduct shipping as a fixed cost from their accounting.
To get the most accurate profit reporting for most stores, you’ll probably want to exclude these items. If you want to exclude any of these parameters, check its box in these settings:
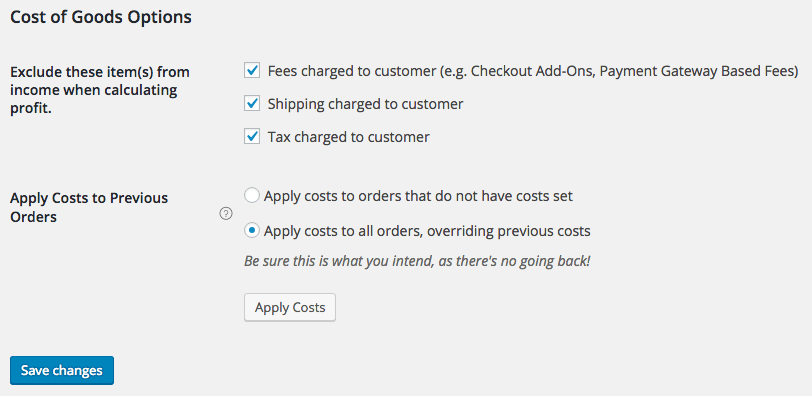
Saving your settings will not trigger the “Apply Costs” action — this action is only triggered by clicking the “Apply Costs” button.
*Note: Fees are determined by recognizing any costs added using the WooCommerce fees API (such as fees added by plugins like Checkout Add-ons). These cannot be configured by the administrator, and the option is simply meant to remove these fees as income in the profit calculation if you choose to exclude them.
Product Costs
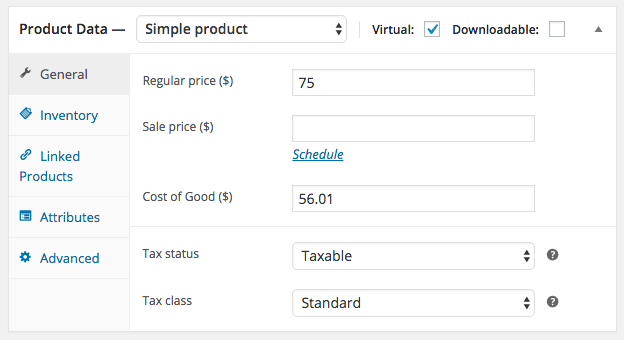
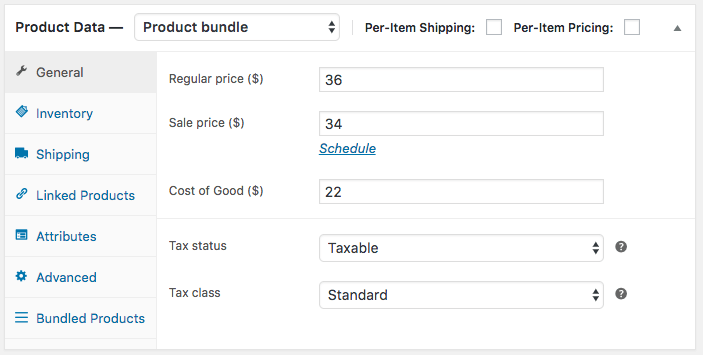
You can add a cost to your products while editing them, and this should only be your cost of producing the good, and should not include tax or shipping. This is done from the Product Edit screen where a new “Cost of Good” field is added to the standard pricing fields for simple products:
Alternatively, you can edit multiple product costs at the same time using the “Bulk Edit” action on the Product View screen. With the Bulk Edit action, you can set a specific cost or increase/decrease the cost by a fixed amount or percentage for multiple products:
 Bulk Edit Product Cost Configuration
Product variations are handled in a similar manner. You can add a default cost for all product variations:
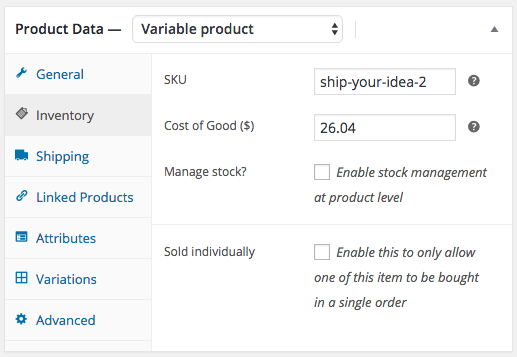
Or, you can manually set a cost for each variation (or override the default cost for only certain variations):
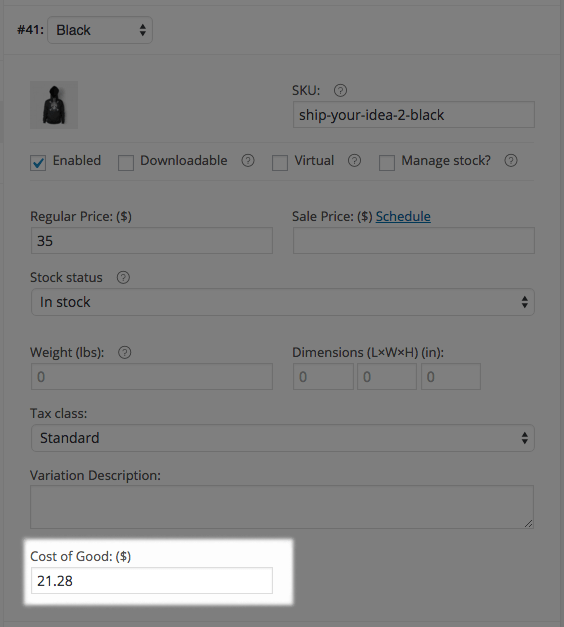
Once the Cost of Goods for a product / variation is configured, there’s no more to it. Orders placed from the checkout page, or manually placed through the admin, will automatically have their costs calculated and stored. Furthermore, the cost at the time of order creation is recorded so that cost totals can be recalculated at any time using the original product costs.
Previous Orders
You can now apply a cost of goods to previously placed orders if desired. Once you install the extension and set costs for your products, you can apply these costs to previously placed orders which don’t already have a cost calculated. Orders will be searched for products that are currently in your catalog and the relevant costs applied so that you can get immediate insight into your profitability.
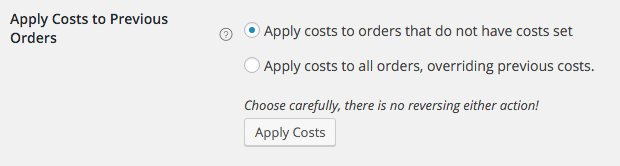
If you choose to override costs this will also override any historical costs associated with orders. This setting is not recommended for most use cases. For example, let’s say one product has historically had a cost of $12 — this will be included in all orders, even if you have now updated the cost to $13 (this is designed to keep historical profit reporting accurate).
If you use the general “Apply Costs” action, orders of this product will not be modified because it had a cost associated. If you choose to override costs, the historical cost will be changed from $12 to $13, changing your previous profit reporting. Only use this setting if you intend to update costs for old orders.
Powerful Reports
The plugin adds a number of new reports found under WooCommerce > Reports under the new “Profit” tab and existing “Stock” tab to give you insight into your product costs and profitability.
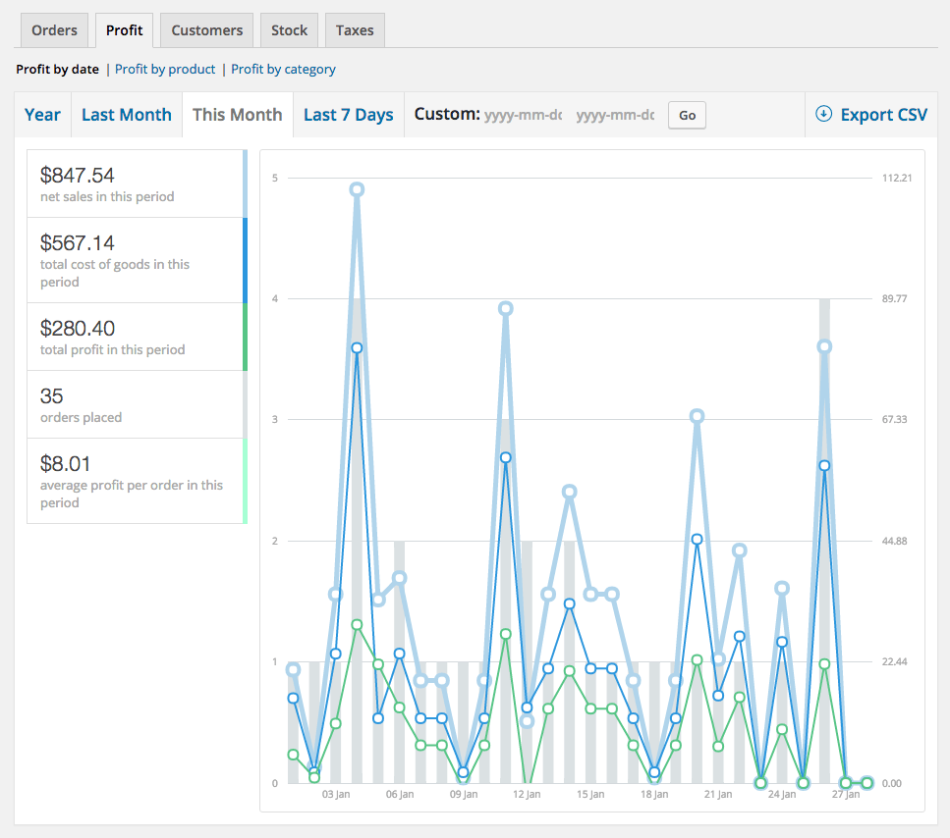
All reports under the profit tab will show data for a specific time span along with a helpful graph of data for the given time span. You can view reports for:
- Year – Data for the current year
- Last Month – Data for the previous calendar month
- This Month – Data for the current calendar month
- Last 7 Days – Data for the past 7 calendar days
- Custom – Data for a specific (configurable) date range
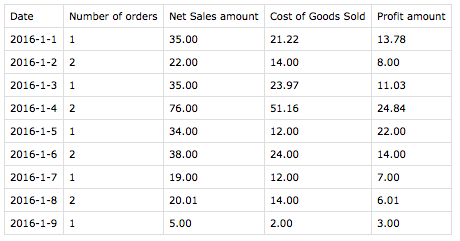
Profit by Date
All profit by date reports will allow you to see your net sales (minus costs you’ve excluded), total cost of goods, total profit, and average profit per order for the selected time span. Hovering over an overview on the left side will highlight the correct portion of the graph.
Profit by Product
All profit by product reports will allow you to see your net sales (minus costs you’ve excluded) for the item, total costs for the item, total item profit, and total item purchases for the selected time span.
In order to view a report, you must select a product in the “Product Search” section. Hovering over an overview on the left side will highlight the correct portion of the graph.
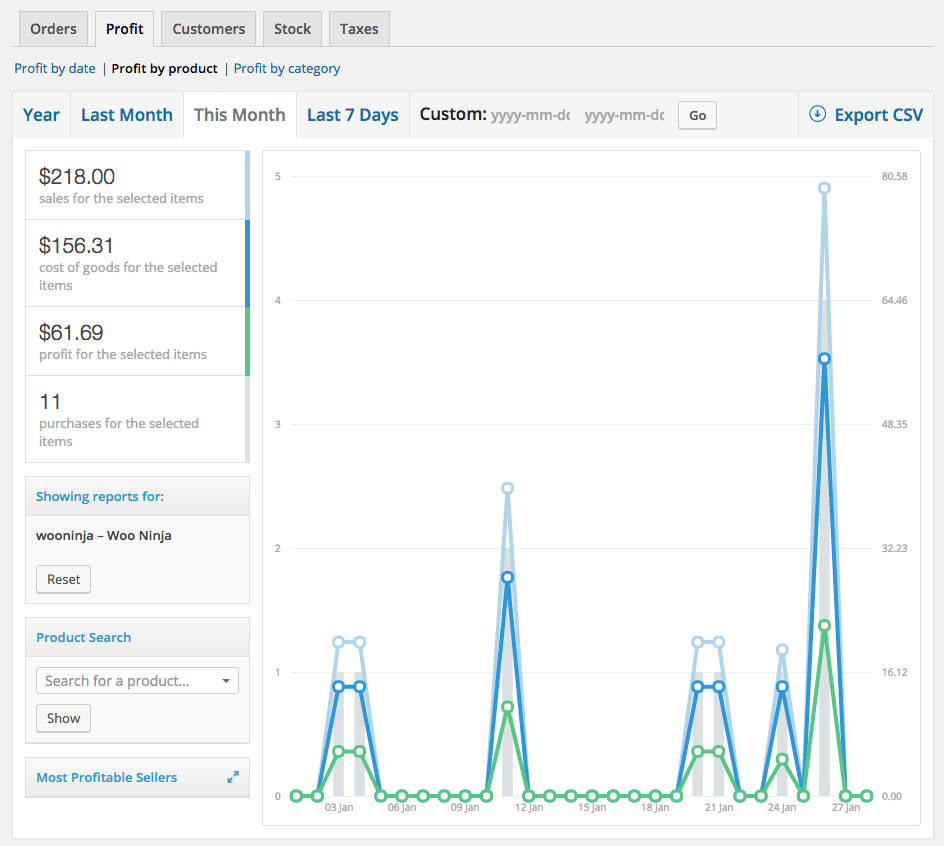
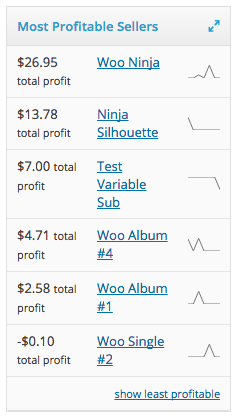
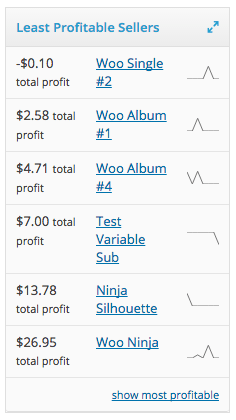
The profit by product reporting section also has a helpful, adjustable widget that will show you most profitable and least profitable sellers for your given time span. You can switch between “most profitable” and “least profitable” product lists by clicking the action in the bottom right of the widget.
Profit by Category
All profit by category reports will show you total profit for each selected category within your given time span. Hovering over an overview on the left side will highlight the correct portion of the graph.
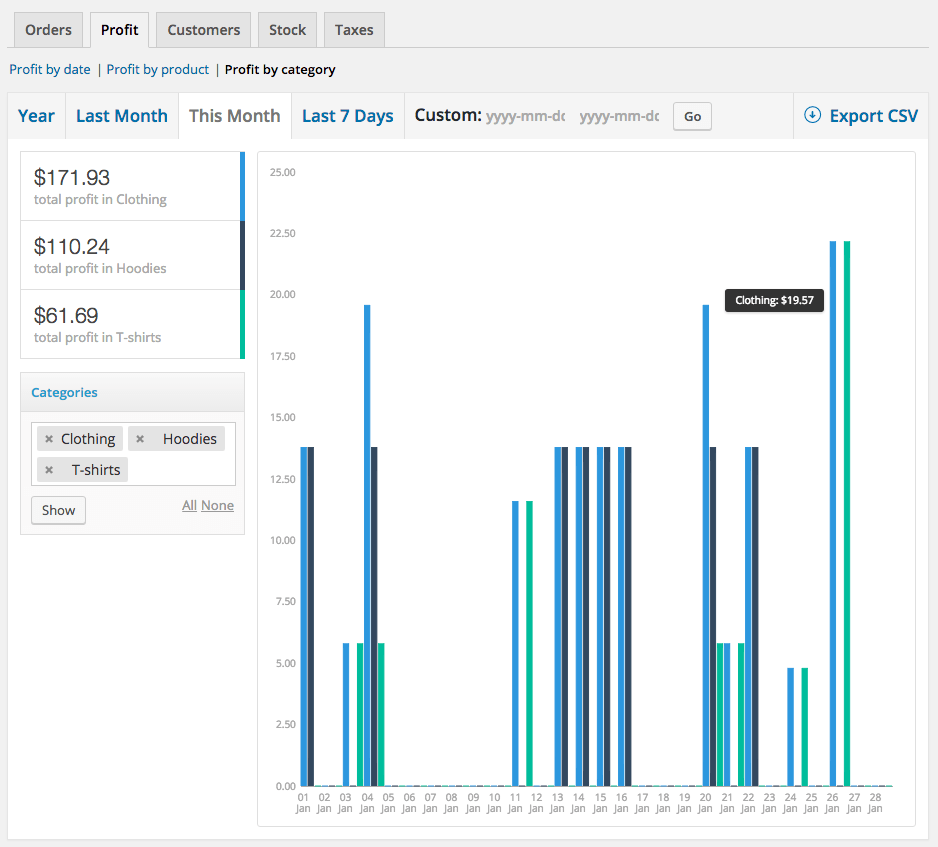
If you select a parent category (such as “Clothing”), the total profit for this category will include the sum of profit for products within this category along with those in child categories (such as “Hoodies” or “Tee shirts”).
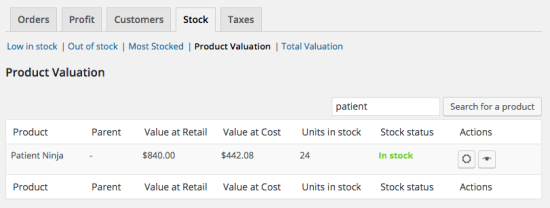
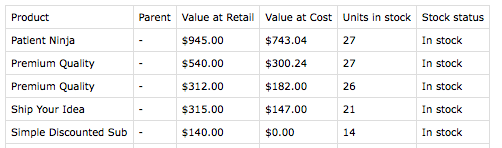
Product Valuation
The product valuation report is located under WooCommerce > Reports > Stock > Product Valuation. This will show you your inventory value at retail price, total value by cost, and units in stock for every product.
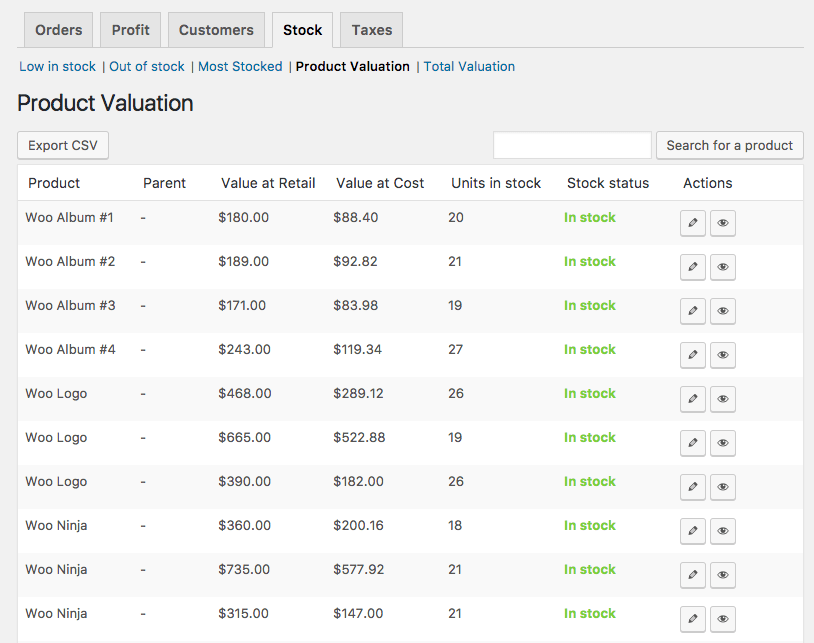
This list is also searchable. You can use the “Search” box to search for a product name and view only the returned results instead.
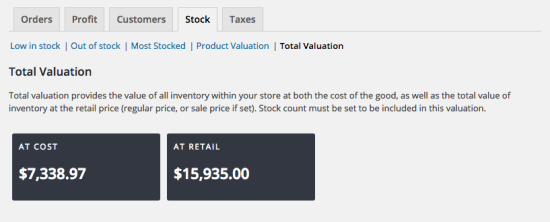
Total Valuation
The total valuation report is located under WooCommerce > Reports > Stock > Total Valuation. This is a simple report to give you the overall value of all stock on hand at retail and at cost for a complete inventory valuation.
Cost Report Exports
All profit reports can leverage the WooCommerce Core “Export to CSV” action. This will export a CSV of the data shown in the report, such as date, cost, sales, number of orders, etc. The exported data will depend on which report you are currently viewing, and will include the data show in the report.
Product Valuation reports can also be exported to get a list of value at retail and value at cost.
Managing Orders
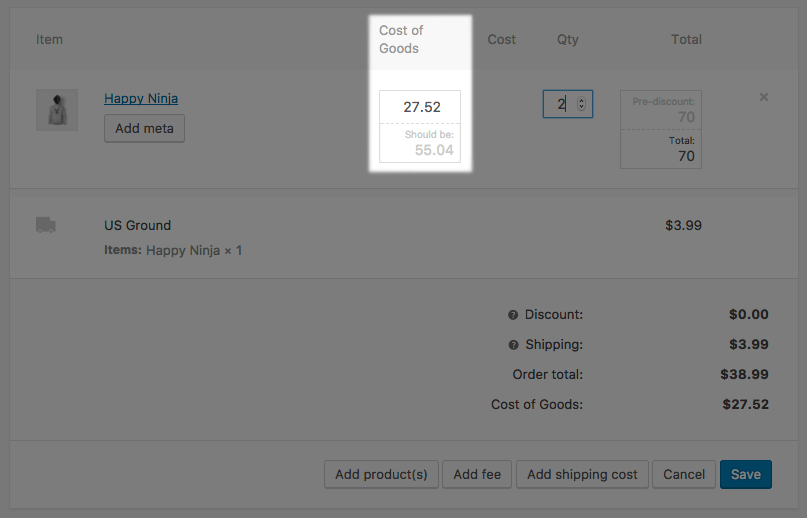
If an order is editable (WooCommerce allows editing before the order is paid for), then the costs for the line item will be editable as well. The “Cost of Goods” value displayed is the total cost of the line item (product cost x quantity purchased), so editing this cost edits the cost for that entire line on the order.
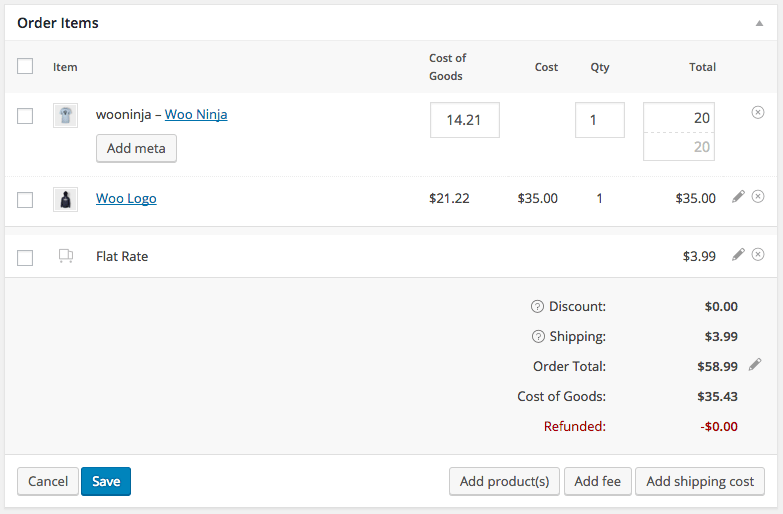
Note that, if you adjust a line item’s quantity, the cost does not automatically update as well. This is because often when manually editing items, such as in the case of refunds, cost doesn’t always equal product cost * quantity. For example, you may want to double the cost for a particular order to indicate breakage during shipping, or to alter the cost from the product’s configured cost. As such, the plugin will suggest the cost as product cost * quantity, but you may configure whatever cost you’d like:
If you need to edit the cost of a product, you can safely do so by editing the product itself. Orders already placed will maintain the historical costs, while new orders will use the updated product cost.
Refunded Orders
If you issue a refund, then the cost of the refunded item will be deducted from your order cost automatically. For example, if you have an order of a product with a $3 cost and a $10 retail price, when refunding that product, the $10 is deducted from your sales, and the $3 is also deducted from your total costs.
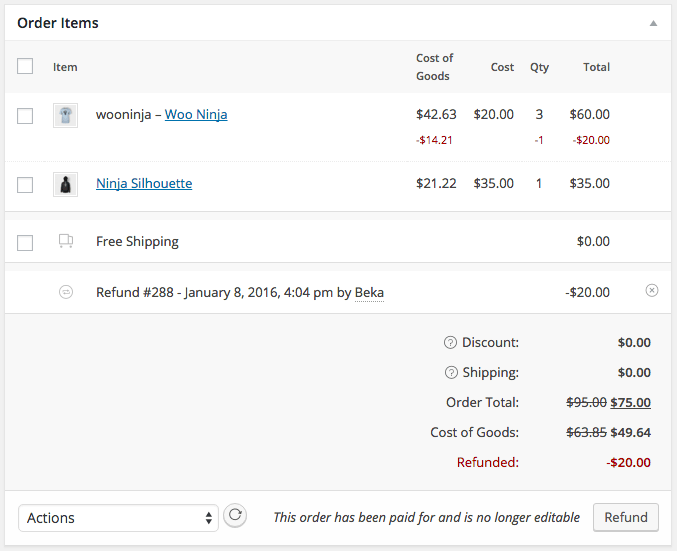
WooCommerce refunds are stored as a unique order type (sort of a mirror / negative of the original order), but these are not editable, so editing the cost of the refunded item is not possible.
If you want to “lose” an item to breakage or maintain its cost when refunded (so you’ll have negative profit tracked for that item), this is not quite possible with the current order set up, as refunded / paid orders are not editable. You’ll need to make all orders editable (be careful!) by adding this to your custom code plugin / theme functions.php:
// Make all WC order statuses editable
add_filter( 'wc_order_is_editable', '__return_true' );
You can then edit the cost to add additional cost for the breakage of the refunded item.
Compatible Apps
Cost of Goods is compatible with several official WooCommerce extensions automatically.
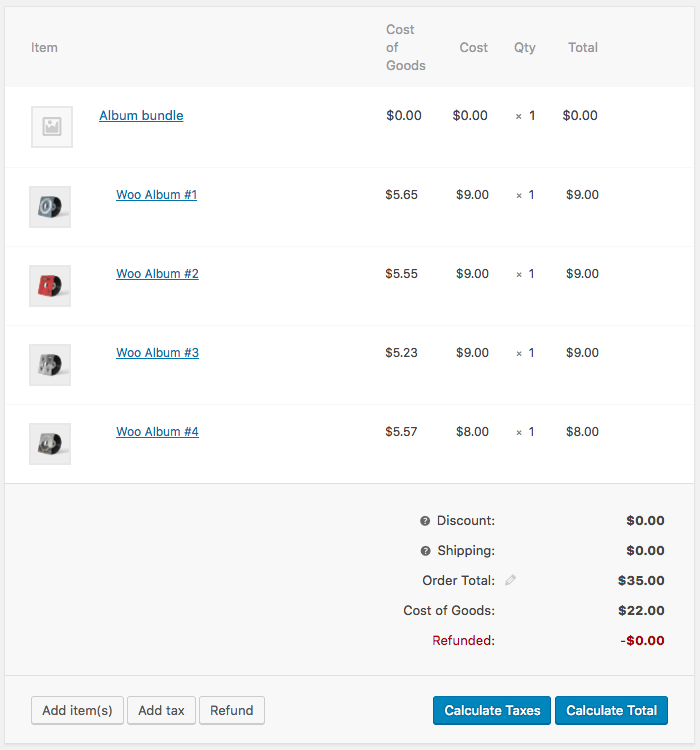
Product Bundles
When Product Bundles is used to sell several products together as a group, you can set the cost for the products or bundle, depending on the bundle configuration.
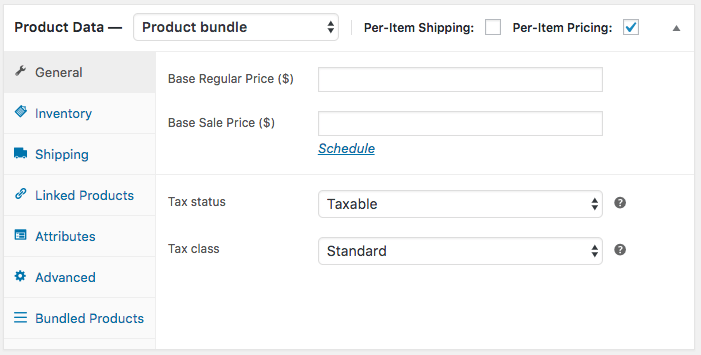
If a bundle is statically-priced, then cost will be assigned to the bundle as a whole. You must enter a cost for the bundle while creating / editing it:
Since the price is assigned to the bundle as a whole, the cost will be assigned to the bundle as a whole as well. This means that profit for a static bundle is tracked as profit for the bundle product, not for the component products.
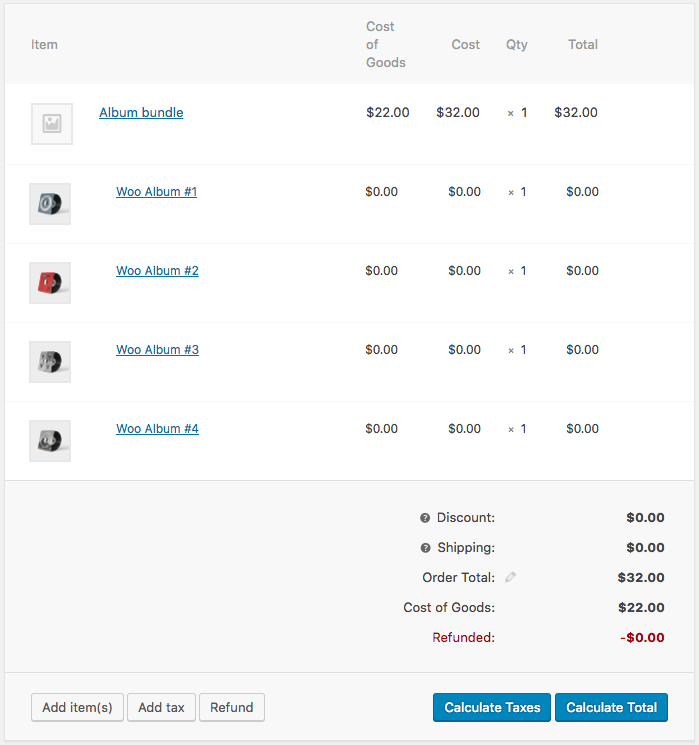
For a per-item bundle, since the pricing of each product is used, any costs configured for those products will be used as well. You must have “Per-item Pricing” enabled to create this type of bundle.
Since the price is tracked per-product and sales are attributed to each product, then the cost for each product will be used as well (this must be configured for the product itself). This will track profit and costs for each component product in the same was as if they were sold individually.