Creating Content

bbPress creates three new menu items in the WordPress backend to manage your three custom post types.These are:
- Forums – Contains all the topics and replies that were created in the forum.
- Topics – Topics are created within forums, they are the subjects that are being discussed.
- Replies – Replies are the actual discussion taking place. They are created within topics and if threaded replies is enabled can be a reply to other users replies.
This guide will help you create each post type, structure categories for your forums, and explain any other attributes to customize each post type.
Creating a Forum
To create a Forum follow these steps:
- Navigate to Forums > New Forum.
- Give your forum a name.
- Optional: You can add text to the description area to describe your particular forum.

- Adjust any additional forum attributes.
Types: choose whether you are creating a forum or category.
Forum – Can contain topics and be the parent of other forums.
Category – Can only contain forums (no topics). Use for organizing your forums.
You may, for example, have a Category “Open Source Software” with the Forums “bbPress” and “WordPress”.
Status: choose whether the forum is open or closed.
Open – Forum users can create new topics in the forum.
Closed – Closing a forum disallows any new topics to be created and also disallows any new replies to any existing topic in a forum. If it is a category or a parent forum of other forums, closing the category or parent forum will close all their child forums.
Visibility: Decide whether your forum is public, private or hidden.
Public – Anyone can see these forums
Private – Only logged in registered users can see these forums
Hidden – Only Moderators/Admins can see these forums
Parent: Forums can have a hierarchical structure. If your forum is a sub-forum of another Forum or is the child of a category, add the parent here.
Order: This determines the order in which the forums appear. Adjust each forum with sequential numbers to reorder your forums.
When you are happy, click Publish.
By default, your forum will be located at http://yourdomain.com/forums/forum/yourforumname
To adjust the default slugs, visit Forums > Settings
Creating a Topic
With your forum created you can start adding topics. You can add a topic from the frontend or from the WordPress backend.
Adding a Topic from the Front End
Navigate to your Forum on the frontend. If you’ve just set up your forum it will have no topics yet.

Give your topic a name and add some content to it.

You can add tags for organizing your topics, and you can make the post sticky or super sticky.
Sticky – Posts will stick to top of the Forum which it is in.
Super Sticky – Posts will stick to the top of all Forums.
You can also select to subscribe to replies via email.
Once you post the Topic it will appear on your Forum.

Adding a Topic from the WordPress Backend
To add a Topic from the WordPress backend,

- Navigate to Topics > New Topic.
- Give your topic a title and some content.
- Adjust any additional topic attributes.
Type: Indicates the topic type to be either sticky or normal.
Normal – This will be the default type of the topic, this will not stick the topic anywhere.
Sticky – Sticks topics to the top of the single forum that they are in.
Super Sticky – Sticks topics to the top of all forums on your site.
Status: Indicates the topic status.
Open – A normal topic without any restrictions. This topic can be replied to by all forum users on your site.
Closed – Restricted from any further replies from Participants. Moderators and Keymasters are able to still reply to these closed topics though.
Spam – Marks the topic as spam. The topic will now show up in your spam queue.
Trashed – Places the topic in the trash, from which you can delete it permanently.
Pending – A topic awaiting approval to be published.
Forum: Choose the Forum you want to add your topic to.
You are also presented areas to input topic tags, password protect topics, set a topic to private for only Admins/Keymasters.
When you have finished creating your topic click Publish.
Creating a Reply
As with topics, replies can be added from either the frontend of your website or from the WordPress Backend.
Adding a Reply from the Frontend
To reply from the frontend, navigate to your forum and click on the topic you wish to reply to.
Add your reply. You can also choose to be notified of follow-up replies via email.

When the reply is added, you’ll see that it’s been added to the WordPress Backend at Replies > All Replies
Adding a Reply from the WordPress Backend
To add a reply from the WordPress Backend,
- Navigate to Replies > New Reply.
- Give your topic a title and some content.
- Adjust any additional reply attributes.

Forum: Choose the forum for the reply to be in.
Topic: Input the ID of the topic you want the reply to be in.
Reply To: This is useful if you have threaded replies enabled. You input the ID of the reply that you want to thread under.
Your reply will now appear on the frontend of your site.
You’ve now got everything you need to get started with creating Forums with bbPress!
Forum User Settings
This area defines the privileges and restrictions for the bbPress forums.
Disallow editing after
Set this to the time (in number of minutes) to limit post editing. Once the time limit has been reached the forum post no longer be available for editing to forum participants. Administrators and bbPress Moderators can override this setting at any time.
Throttle posting every
Set this to the minimum time (in seconds) between posting new replies in bbPress forums. This is useful to help stop spamming or other attempts to interrupt the normal flow of the forum.
Anonymous posting
Any site visitor can post a new topic or reply without the need of logging into your site. They will still be required to enter a name and email to post, but will not be required to create a username or password and will not be shown in the list of WordPress Users.
Auto Role
Select the default role for bbPress forum members to be assigned, the roles are Keymaster, Moderator, Participant (Default), Spectator and Blocked. For full details of the permissions assigned by these roles please User Roles and Capabilities.
Forum Features
Revisions
WordPress stores a new version of posts each time a draft is saved or a post is edited and republished. Enable or disable this for bbPress topics and replies here. To learn more about revisions, check the WordPress codex article on Revision Management.
Favorites
Forum participants can “favorite” any topic. These topics are available later for review from the participant’s forum profile. Additionally a custom RSS feed is available allowing participants to stay up to date on topics that are important to them.
Subscriptions
Forum participants can elect to subscribe to a forum or topic. They will be notified when a new topic is created in a subscribed forum or a new reply is posted to a subscribed topic. Subscribed forums and topics will appear on their forum user profile.
Topic Tags
This will disable topic tags site wide and will no longer show topic tags associated with each topic or the topic tag input form.
Search
This will enable forum wide search allowing users to search for forums, topics and replies within your forum.
Post Formatting
This will add the toolbar & buttons to the textarea to help with HTML formatting, the defaults are ‘b’ (bold), ‘i’ (italic/emphasis), ‘link’ (URL Hyperlink), ‘del’ (strikethough), ‘img’ (Link an image via URL), ‘ul’ (Unordered List), ‘ol’ (Ordered List), ‘li’ (List Item), ‘code’ (HTML/PHP/SQL Code for preformatted text) & ‘close tags’ (Closes any unclosed tags).
Auto-embed Links
Enable forum participants to embed links from YouTube, Twitter, and others by simply pasting a link into their topic or reply. This is done using the WordPress oEmbed API. More information and a full list of supported sites can be found on the Embed Codex page.
Reply Threading
This will allow your users to reply to specific replies, providing context to the discussion in a ‘threaded’ view. This will also remove topic pagination so the topic and all replies will only be a single page.
Allow Global Access
In a WordPress Multisite install bbPress is activated on individual sites. Allowing global access will permit all users from across the network to post topics and replies on the forums for this particular site.
Topics & Replies Per Page
Topics – How many topics to show per page.
Replies – How many replies to show per page.
Topics & Replies Per RSS Page
Topics – How many topics to show per RSS page
Replies – How many replies to show per RSS page
Forum Root Slug
Forum Root – Used to prefix custom root slugs onto forums
Forum Prefix – Used to enable forum prefixing with the Forums base slug in Archive Slugs
Forum root should show – Sets your forums to display an index of your forums or a list of the most recent topics.
Single Forum Slugs
Forum – Used to prefix forum root slugs
Topic – Used to prefix topic root slugs
Topic Tag – Used to prefix single topic tag root slugs
Topic View – Used to prefix topic view root slugs
Reply – Used to prefix reply root slugs
Search – Used to prefix search root slugs
Forum User Slugs
User base – Used to prefix user root slugs
Topics Started – Used to prefix user created topics slugs
Replies Created – Used to prefix user created replies slugs
Favorite Topics – Used to prefix users favorite topics slugs
Topic Subscriptions – Used to prefix users subscriptions slugs
Common Tasks
Moving a Forum
It is possible to move a forum from different parent forums or categories. To achieve this;
- Login to the WordPress backend and go to Forums > All Forums
- Edit the specific forum you want to move
- Now change the Parent forum attributes of the selected forum
You can also optionally select — No parent — , so that the forum will no longer have a parent forum or category.
Closing a Forum
Closing a forum can close any child forums and also restricts new topic creation and new replies being created to existing topics in the closed forum.
- Login to the WordPress backend and go to Forums > All Forums
- Edit the specific forum you want to close
- Now change the Status forum attributes of the selected forum to Closed
Deleting Forums
- Login to the WordPress backend and go to Forums > All Forums
- You will see a list of forums, and by each forum a set of links with one being the red Trash link.
- Click the Trash link for the specific forum you want to move to the trash then delete.
- Now click the Trash action link toward the top to filter and see only trashed posts, then Delete or Restore you forums from there.
- To delete all the forums in the trash, click the Empty Trash button.
Editing a Topic
In the frontend
- Log into your site go to your forums on your site
- To edit a topic go into the topic and hit the Edit Admin Link on the topic post.
- From there you can do most of what is listed below, add or remove the topic’s tags, and edit the topic’s post.
In the WordPress backend
- Login to the WordPress backend and go to Topics > All Topics
- Hit the Edit Link by the topic you want to edit.
Closing Topics
Closing or locking a topic disallows any further replies from participants. Keymasters and moderators can still reply though.
In the frontend
- Log into your site go to your forums on your site
- To close a topic go into the topic and hit the Close Admin Link on the topic post. You can also edit the topic by clicking the Edit Admin Link, and changing the Topic Status to Closed.
In the WordPress backend
- Login to the WordPress backend and go to Topics > All Topics
- You will see a list of topics, and by each topic there are a set of links, with one being the Close link.
- Click the Close link for any topics you want to disallow any further replies to.
Sticking a Topic
In the frontend
- Log into your site and go to your forums on your site
- If you need to stick a topic to the top of a forum or all forums, go into the topic and hit the Stick Admin Link to stick the topic to the top of a forum, or hit the (To Front) Admin LInk to Super Sticky or stick a topic to the top of all forums. You can also just edit the topic by clicking the Edit Admin Link and change the Topic Status to Sticky or Super Sticky.
In the WordPress backend
- Login to the WordPress backend and go to Topics > All Topics
- You will see a list of topics, and by each topic there are a set of links, with one being the Stick link and the other being the (To Front) link.
- Click the Stick link for the topic you want to make Sticky. To make a topic Super Sticky, or stick to the top of all forums click the (To Front) link .
Merging Topics
- Log into your site and go to your forums on your site
- If you need to merge a topic, go into the topic and hit the Merge Admin Link.
- You are presented with a page with options to configure how you want to merge your topics together. Select the topic you want to merge from a list of topics in the same forum and configure extras such as keeping the subscriptions, favorites, topic tags from the original topic.
- After configuring to your liking, click the Submit button.
To merge a topic into another topic from a different forum, you may need to move the topic to the other forum first then merge from there.
Deleting Topics
In the frontend
- Log into your site and go to your forums on your site
- If you need to delete a topic, go into the topic and hit the Trash Admin Link to put the topic into the trash.
- Now you will see that the trash link has turned to the Delete Admin Link , and from there you can click Delete to delete the topic permanently.
In the WordPress backend
- Login to the WordPress backen and go to Topics > All Topics
- You will see a list of topics, and by each topic there are a set of links, with one being the red Trash link.
- Click the Trash link for the topic you want to delete. Now your topic is in the trash.
- Now you can click the Trash action link toward the top to filter and see only trashed posts then Delete or Restore your topics from there.
- To delete all the topics that are placed in the trash, click the Empty Trash button.
Marking Topics as Spam
In the frontend
- Log into your site and go to your forums on your site
- If you need to mark a topic as spam, go into the topic and hit the Spam Admin Link to put the topic into spam queue.
In the WordPress backend
- Login to the WordPress backend and go to Topics > All Topics
- You will see a list of topics, and by each topic a set of links with one being the red Spam link.
- Click the Spam link for the topic you want to mark as spam. Now the topic is in the spam queue.
- Click the Spam action link toward the top to filter and see only topics marked as spam, then either Unspam legitimate posts or Delete all the topics that are placed in the spam queue by clicking the Empty Spam button.
Moving a Topic
In the frontend
- Log into your site and go to your forums on your site
- If you need to move a topic, edit the topic, and change the forum that the topic is in.
In the WordPress backend
- Login to the WordPress backend and go to Topics > All Topics
- Edit the specific topic you want to move
- Change the Forum in the topic attributes of the selected topic
Splitting a Topic
- Log into your site and go to your forums on your site
- If you need to split a topic, go into the topic and at the reply you want to split from hit the Split Admin Link.
- You are presented with a page with options to configure how you want to split your topic.
- You may split the replies into another existing topic or create a new topic from the reply you split off. You can configure extras such as keeping the subscriptions, favorites, topic tags from the original topic.
- After configuring to your liking, click the Submit button.
Editing a Reply
In the frontend
- Log into your site go to your forums on your site
- To edit a reply hit the Edit Admin Link near it.
- From there you can do most of what is listed below, and edit the replies post.
In the WordPress backend
- Login to the WordPress backend and go to Replies > All Replies
- Hit the Edit Link by the reply you want to edit.
Moving a Reply
- Login to the WordPress backend and go to Replies > All Replies
- Hit the Edit Link by the reply you want to edit.
- You will now see metaboxes for Reply Attributes. To change the topic the reply is in change the number by Topic: to the ID of the topic you want to move it to. A plugin like Reveal IDs would help you easily find the IDs of topics in Topics > All Topics.
- Make sure that the topic you want to move the reply is in the correct forum listed in Forum: in the Reply Attributes.
You can also move a reply to thread under a specific reply by placing the ID of the reply you want the reply to thread under in Reply To: in the Reply Attributes.
Deleting a Reply
In the frontend
- Log into your site and go to your forums on your site
- If you need to delete a reply, go to the reply and hit the Trash Admin Link to put the reply into the trash.
- Now you will see that the trash link has turned to the Delete Admin Link , and from there you can click Delete to delete the reply permanently.
In the WordPress backend
- Login to the WordPress backen and go to Replies > All Replies
- You will see a list of replies, and by each reply there are a set of links, with one being the red Trash link.
- Click the Trash link for the reply you want to delete. Now your reply is in the trash.
- Now you can click the Trash action link toward the top to filter and see only trashed posts then Delete or Restore the topics from there.
- To delete all the replies that are placed in the trash, click the Empty Trash button.
Marking Replies as Spam
In the frontend
- Log into your site and go to your forums on your site
- If you need to mark a reply as spam, go to the reply and hit the Spam Admin Link to put the reply into spam queue.
In the WordPress backend
- Login to the WordPress backend and go to Replies > All Replies
- You will see a list of replies, and by each reply a set of links with one being the red Spam link. Click the Spam link for the reply you want to mark as spam. Now the reply is in the spam queue.
- Click the Spam action link toward the top to filter and see only replies marked as spam, then either Unspam legitimate posts or Delete all the replies that are placed in the spam queue by clicking the Empty Spam button.
Dealing with Spam
There is many areas on your site where spam could wreak havoc that you will need to focus on, and while spam can increase the workload of forum Moderators and Keymasters, this guide will hopefully lead you in the right direction to add a wall of defense against spam and help keep spam on your website to a minimum.
Identifying Spam
What is Spam?
It is most common for spam posts to consist of links and more often with an advertisement that leads to external sites with the goal of increasing search engine visibility and generating more traffic to their websites.
There are usually two types of spammers.
- Automated – Mainly a script that is able to register an account to websites and post.
- Human – An actual human being spamming websites.
Automated Spambot
Below is an example of a spambot that leaves posts similar to this.
The automated spam bot will most likely do all of the actions listed below.
- Place a single link or multiple links to a site/s for a business or service. The links could be hidden in a large amount of text for it to not be easily seen.
- Leave a description of their website in posts and also their forum profile.
- Bump and reply to old topics.
- Reply to topics and leave a minimal reply like “good” or copy an existing reply in a topic but slip in a link at the end.
- Titles of some topics may seem not to be relevant to the information in the posts content.
- Post off-topic replies.
- Have their display name and username be the website they are linking to.
- Post in an entirely different language then what is in the topic.
These usually fill out most input fields automatically and are very easy to spot and identify. These spammers could be easily handled by some plugins listed in this guide.
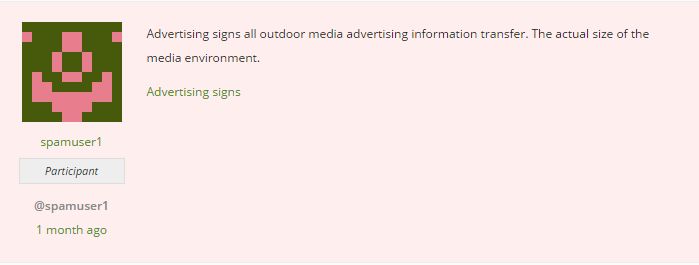
Human Spammer
Below is an example of a human spammer that leaves posts similar to this. Some won’t be as obvious as this though so it is the moderator’s decision to make any further.
![]()
The human spammer will most likely do all of what is listed below as well as possibly do some actions a normal spambot would do.
- Get past most spam checks.
- Could have a Gravatar.
- Post on-topic replies.
- Bump and reply to random topics.
- Post infrequently.
Human spammers could be incredibly difficult to distinguish from other users in your forums, but you can identify a spammer by their actions on your website by checking their activity on their forum profile.
It is best to have moderators in your forums to decide on which users are in fact spammers based on their observations of the user, and see if they do any of the actions listed above.
Inbuilt Tools to Handle Spam
All these settings should be in the WordPress backend in Settings > Forums.
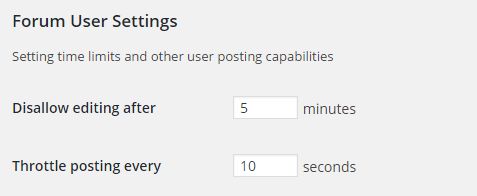
Editing time
bbPress allows users to edit their own topics and replies. This is great to fix minor typos, unfortunately it also gives some spammers a chance to write a friendly reply first then edit it later to link back to the spammers website.
The default setting of 5 minutes should be fine. Going lower on this setting would be better but make sure this doesn’t annoy your users. This setting does not affect Keymasters and Moderators as they have the capability to edit posts indefinitely.
Throttle time
Throttle time or flood control, is the required amount of time a single author is able to post. This is to avoid users posting multiple times in a short time span and to help avoid abuse from programs delivering spam.
The default setting of 10 seconds is fine. Going higher on this setting would be better but make sure that it would not annoy your users.
Akismet integration
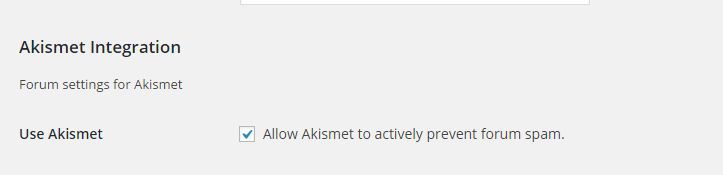
bbPress is fully integrated with Akismet. Akismet scans a bbPress topic or reply before it is posted to see if it is spam or ham (not spam) with it’s scanning service which runs hundreds of tests and either marks a post as spam or not. If it does catch a topic that is spam, you will see it in the WordPress backend in the topics section under spam, and the same process for replies.
Using WordPress Comment Moderation Settings
Not much people know this but you can use WordPress’s comment moderation and blacklisting settings for bbPress. You can find more information about that in the Moderation and Blacklisting Guide.
If you need a curated list of words to add into the comment blacklist, you can find a list on Github and from there you can copy the text from whatever file you need. On the page you can read below how to use it manually or installing plugins like Comment Blacklist Manager that will automatically update the curated list to your comment blacklist section.
Topic and Reply Form Protection
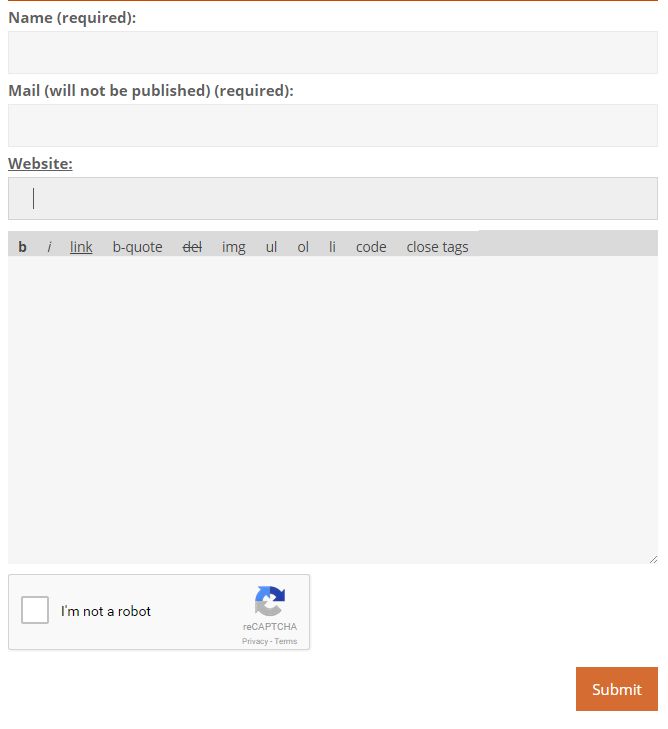
One great way to stop spam posts from being present on your forums is to have some kind of protection on the topic and reply creation forms in your forums. There are tons of plugins like Akismet that are integrated with bbPress to help stop spammers from posting any of their mess. Having some kind of protection against spammers on the topic and reply forms is especially helpful if you have enabled anonymous posting on your site. Having this enabled will allow anyone to post to your bbPress forum without even being registered to your site, enabling anonymous posting lets spam wreak havoc because of this. If you do want to use anonymous posting, it is recommended that you protect the topic and reply forms from spam.
Check out any plugin’s listed below homepage on WordPress.org for more information about setting it up.
Use a captcha
- Advanced noCaptcha reCaptcha – Uses Google’s reCAPTCHA service to display a captcha on topic and reply forms.
- Math Captcha – This is just a simple math captcha.
Use a honeypot
- Spam Destroyer – Inserts a hidden field on topic and reply forms that spambots will automatically fill out in most cases and be caught as a spammer.
Moderation notifications
Using bbPress Notify you can optionally pick the roles that would receive notifications of any new topic/reply post.
Manual approval
Installing bbPress Moderation will give you the ability to manually approve pending topics and replies awaiting moderation.
Registration Spam
Make sure you have some kind of spam protection on the registration form of your site since this is the access point to your site for bbPress. Let it be either registration honeypots, captchas, questions, and IP blacklist databases to block the spammers from accessing your site.
If you have BuddyPress installed it may be helpful to also check out their guide for some plugins that work with BuddyPress’s registration process and form.
Check out any plugin’s listed below homepage on WordPress.org for more information about setting it up.
Required email confirmation
A way to avoid spam registrants is to require new registrants to confirm their email for activation. There are tons of plugins in the WordPress repository that allow this kind of functionality and some also allow custom login/registration forms like Theme My Login.
Manually Approve New Registrants
Manually approving users might be useful for a small niche community or a site that has been through a large spam attack and now wants to allow the Admins to manually approve each new user. Luckily there are a couple of WordPress plugins that can do this, here is one of the few WP Approve User.
Invitation Only
For a very private site you can allow to send invites to certain members with WP-Invites.
Registration captcha
- WangGuard – Allows the user to input an answer to a custom question during registration. You can input multiple custom questions for the registrant to try to answer in the plugin settings.
- Advanced noCaptcha reCaptcha – Uses Google’s reCAPTCHA service to display a captcha on the registration form.
- Math Captcha – This is just a simple math captcha.
Registration Honeypot
- Spam Destroyer – Inserts a hidden field on the bbPress registration page, the default WordPress registration page, multisite compatible.
- WangGuard – Includes an option to insert a honeypot in the registration form.
IP blacklist databases
To check if the current user trying to register is a spammer based on their IP using IP blacklist databases you can use any of the following plugins listed below.
| Plugin Name | Blacklist Databases |
| Stop Spammers Spam Prevention | StopForumSpam, Project Honeypot, BotScout, Spamhaus |
| Bad Behavior | Project Honeypot |
| AP HoneyPot WordPress Plugin | Project Honeypot |
| WP Stop Forum Spam | StopForumSpam |
IP Blacklist Database sites*
StopForumSpam
Project Honeypot
Spamhaus
BotScout
All In One Anti-Spam Solutions
WangGuard
WangGuard is a freemium solution that requires registration and an API key from their site. It handles registration spam quite well and also includes security questions on the registration forms, registration honeypot, duplicated account verification, blocking users by their email domain, cleaning unwanted registered spam users and much more in additional separate plugins.
Stop Spammers Spam Prevention
The plugin Stop Spammers Spam Prevention is really useful for handling registration spam and also includes tools to handle comment and contact form spam. This has features like scanning an IP address with 4 different IP blacklist databases, denying disposable email addresses, block invalid HTTP-REFERRER, block users with over 64 character usernames and emails, block bbcode posts, block specific countries from registering to your site, and much more to stop registration spam.
Additional Steps to Stop Spam
Allow your community to report posts
You can let the users on your site report users as spam on your site using two very similar plugins
- bbPress – Report Content
- bbpress – Report Abuse
They both add a “Report” link to the admin links on each post near the reply link. When each post is reported in either plugin, the Moderators and Keymasters will see a notification/message that the particular post reported needs their attention. The Moderators and Keymasters will then take action and either spam the post or un report the post if it is accepted as safe.
Using rel=nofollow on links
The nofollow attribute is a method to stop spammers. bbPress automatically adds rel=nofollow to all hyperlinks in a reply or a topic post. SEO Spammers will deprive no benefit from posting on your forums.
Create community guidelines
You can make the text widget pretty handy in your sidebar and create a list of guidelines for your users to follow, make a super sticky topic with forum rules to show on all forums on your site, and you can just link to a separate page that lists all your forum rules.
Allow login from social networks
Installing a social login or registration plugin will limit the amount of spam registrants on your site. There are tons of plugins free or paid that can accomplish this, so take a look and compare each and choose the best plugin that peaks your interest.