Payroll
The Payroll extension allows you to run a complete Payroll system using WordPress.
If you have worked with other Payroll software, then the setup and terminology should all be familiar to you.
The basic flow of the Payroll extension is as follows:
- Setup marginal tax rates (if required)
- Add a Pay Calendar and add your employees to the calendar
- Add a Pay Template for each employee
- Before each pay period’s payment date, start a Pay Run. This will create the Pay Slips and send them to your employees
- Repeat step 4 for each pay period
Below is a very detailed, step-by-step guide on running your business Payroll using the Payroll extension for Business Manager.
Settings
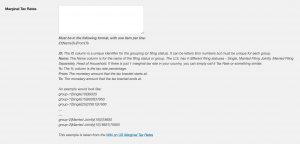
Here you can define marginal tax rates if you will be using them. There is detailed instructions on this page on how to use the marginal tax rates so please use them as the guide. Once the marginal tax rates are setup, you will be able to select these rates for your employees.
Pay Calendars
Overview
A Pay Calendar is used to define pay periods, or pay cycles and you can add unlimited Pay Calendars.
You set the Pay Period Frequency, the Pay Period Start Date and the first Payment Date. You then add the employees that will be paid on this Pay Calendar.
** It is important to add your employees to a Pay Calendar so that their Pay Slips can be created when running a Pay Run.

Example:
You want to pay all of your employees on a monthly pay cycle, with pay day being the 15th of each month and starting from next month.
- Ensure you have all of your employees added to the system. Go to Employees > New Employee to start adding employees.
- Go to Business Manager > Pay Calendar and click the ‘New Pay Calendar’ button
- Choose Monthly from the Pay Period Frequency dropdown
- Select when your pay period will start, such as the 1st of next month
- Select the 15th of the next month for the First Payment Date
- Use the checkboxes to choose the employees to add to the Pay Calendar
- Click the ‘Publish’ button
Your Pay Calendar is now setup and you can move onto setting up Pay Templates for your employees.
Pay Templates
** Important: You should set up a Pay Calendar first and add your employees to the Pay Calendar. This will determine their number of ‘Pays Per Year’ (default ‘Pays Per Year’ is 52). This is important for calculating the tax paid on each pay cycle.
Overview
Pay Templates allow you to setup templates to be used on a per employee basis. This will save you time as you won’t need to manually create a Pay Slip each time you run the payroll.
When you run the payroll (by doing a Pay Run), this Pay Template is copied to the Pay Slip which can then be freely edited.
So by adding a Pay Template for your employee, you are not locked into using the Pay Template each pay – all amounts are freely editable so you can add overtime or adjust rates for the pay period etc.
Instructions
- Navigate to Business Manager > Employees
- Click on any employee to edit (or click the ‘New Employee’ button to add a new one)
- Scroll down to see the new Pay Template section
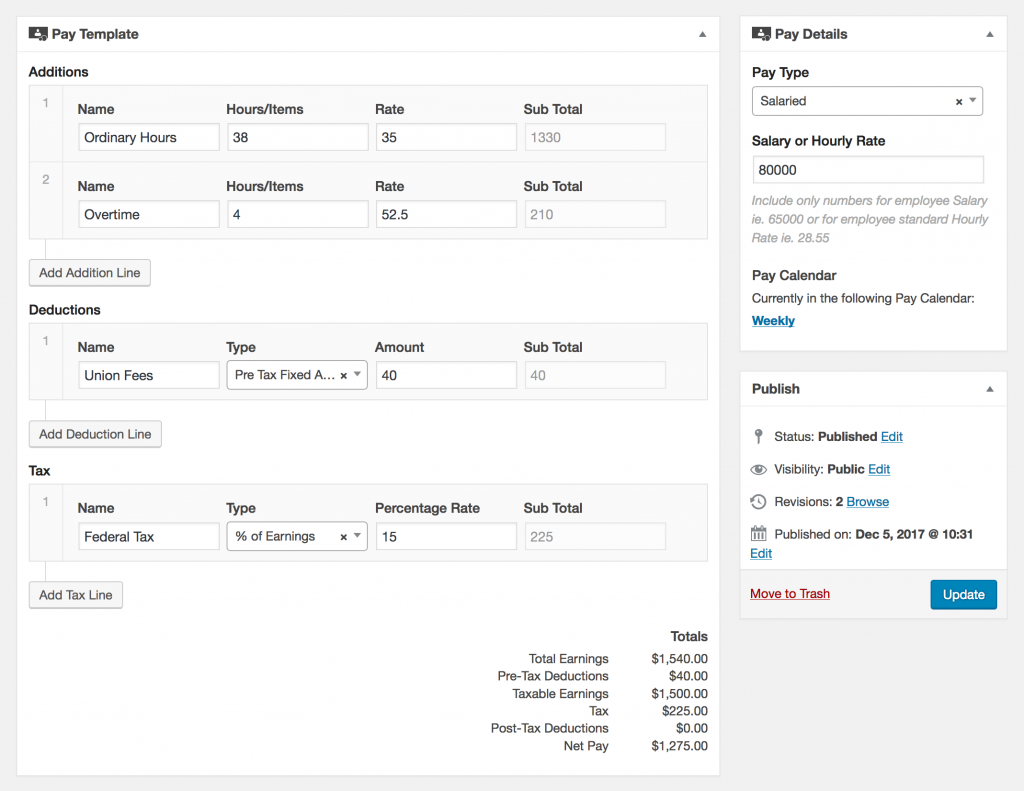
In this section there are 3 repeatable field types – Additions, Deductions and Tax.
Additions allow you to add any earnings that the employee makes for the pay period.
Example: If an employee works a 38 hour week and is paid $35 per hour, you would:
- Add a Name for this line item, such as Ordinary Hours or Wage
- Add 38 in the Hours/Items field
- Add 35 in the Rate field
- Clicking ‘Publish’ or ‘Update’ will then automatically calculate the Sub Total of this line.
If you wanted to add a fixed amount, you would follow the steps above but add 1 into the Hours/Items field and the fixed amount into the Rate field.
Deductions allow you to add any deductions (pre or post tax) that will be taken from the employees wage.
Deductions work in much the same way as Additions, except that they deduct from the total instead of adding to the total.
Example: You need to deduct $40 from the employees pay each week. The deduction is a pre tax deduction.
- Add the name of the deduction in the Name field
- Choose Pre-Tax Fixed Amount in the drop down
- Add 40 into the Amount field
- Clicking ‘Publish’ or ‘Update’ will then automatically calculate the Sub Total of this line, which will be $40.
To do a deduction of 2% of the employees wage, follow the steps above but in the Type field, choose Post Tax % and then add 2 into the next field.
Tax allows you to add tax as a Fixed amount, as a % of the employees earnings or at a marginal tax rate (if this is set up in the Settings).
Example: Your employee is taxed at a rate of 15% of their earnings.
- Add the name of the tax into the Name field
- Choose % of Earnings in the Type dropdown
- Add 15 into the next field
- Clicking ‘Publish’ or ‘Update’ will then automatically calculate the Sub Total of this line item
For marginal tax rates, if you have set this up in the settings then they should appear in the Type dropdown. You simply need to choose the required rate and give it a name in the Name field.
All of the maths will be done behind the scenes to calculate the tax payable once the ‘Publish’ or ‘Update’ button is clicked.
Pay Runs
Pay Runs need to be done for each pay cycle, usually on or before the payment date.
A Pay Run is used to create the Pay Slips and send them to your employees.
Example: You have created a Pay Calendar and all of your employees have been added to it. You have also setup Pay Templates for each employee. You now want to create the Pay Slips and send them to the employees.
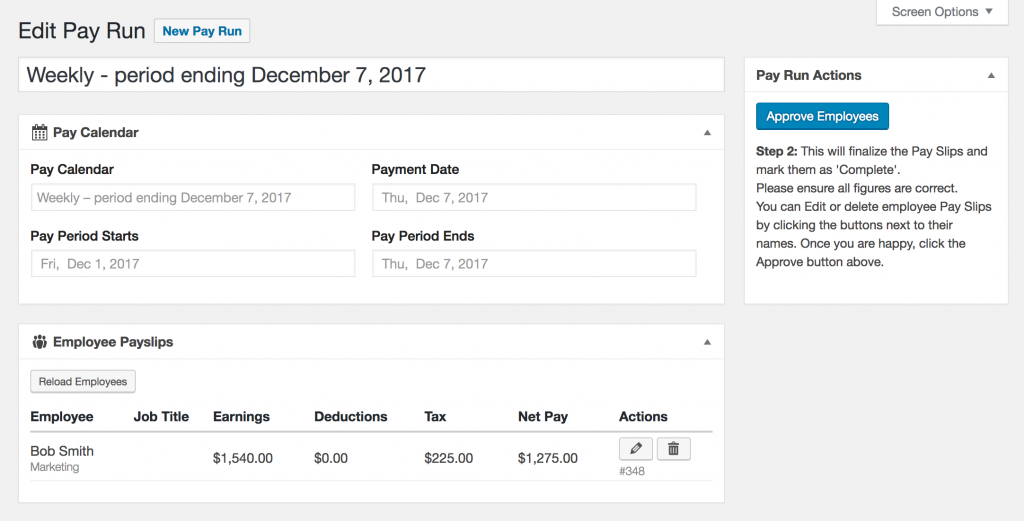
- Go to Business Manager > Pay Runs and click the ‘New Pay Run’ button
- Choose the Calendar/Pay Period from the Pay Calendar dropdown and confirm the dates are correct.
- Click the ‘Start Pay Run’ button
- The list of employees should now appear under ‘Employee Pay Slips’. Data from each employees Pay Template has been copied to the newly created Pay Slips.
- Click the edit button (pencil icon) next to any employee whos Pay Slip needs to be edited.
- When you click the edit button, you will be directed to the Pay Slip to be edited.
- Once you make the changes to the Pay Slip, simply click ‘Update’ and you will then be redirected back to the Pay Run.
- Delete any employees from this Pay Run by clicking the button with the trash can icon.
- Deleting an employee here will only remove them from this Pay Run. They will still remain in the Pay Calendar for the next Pay Runs.
- Click the edit button (pencil icon) next to any employee whos Pay Slip needs to be edited.
- When you are happy with the employees Pay Slips and all of the amounts look correct, click the ‘Approve Employees’ button. This marks the Pay Slips and the Pay Run as ‘Complete’.
- To automatically email a PDF copy of the Pay Slip, click the ‘Send Pay Slips’ button.
Pay Slips
Pay Slips, or Pay Stubs as they are also known, are created during the running of a Pay Run but they can also be created as individual Pay Slips and be completely separate from Pay Runs.
As part of a Pay Run
Pay Slips will be austomatically created when you carry out a Pay Run and each Pay Slip title will be in the format of ‘Employee name – PR-ID’ so will look something like: Jane Doe – PR-26. The PR-26 represents the Pay Run with the ID of 26.
You can view individual Pay Slips by going to Business Manager > Pay Slips. Clicking into each Pay Slip will allow you to Re-Create the PDF, Download the PDF or Email the PDF by simply clicking on the appropriate button.