Restaurant Ordering
Restaurant Menu & Food ordering
WP-Food is a WordPress plugin that helps restaurant owners to create restaurant menu and manage food orders online. With the rise of online ordering services, this plugin is simple way to introduce food menu, customers only need 3 steps for a delicious meal: choice food -> Order -> Enjoy. It works properly with non WooCommerce and WooCommerce. In addition, with WooCommerce integration, customers can have payment online easily and restaurant owners also view orders online report everyday, every month. By this WP-Food plugin you can display all menu information with any styles, layouts and anywhere via shortcodes.
Features list
- 10+ Food Styles support
- Online Food ordering and manager
- Online Food ordering via WooCommerce
- Quick ordering food support
- Fully responsive and mobile ready.
- Unlimited WP-Food anywhere.
- Support with many columns(2, 3, 4, 5)
- WP-Food with Grid, List, Table, Carousel(Slider view)
- Admin create Food and manage order easily
- Support email to admin and customer after order
- Able to enable recaptcha v2 when checkout
- Support select food by location
- Ajax load more, pagination, popup food info
- Support setting minimum amount
- Add admin review food(Food rating)
- Support open closing time order
- Work properly with non Woocommerce and Woocommerce integration
- Unlimited WP-Food Color. You can set color for all or each style
- Support category – allows you create menu category, you can show all menu items or show by category
- Single Food support
- Custom food info
- Food images gallery
- Unlimited customize with font, color
- Visual Composer support
- Supper easy configuration
- And more …
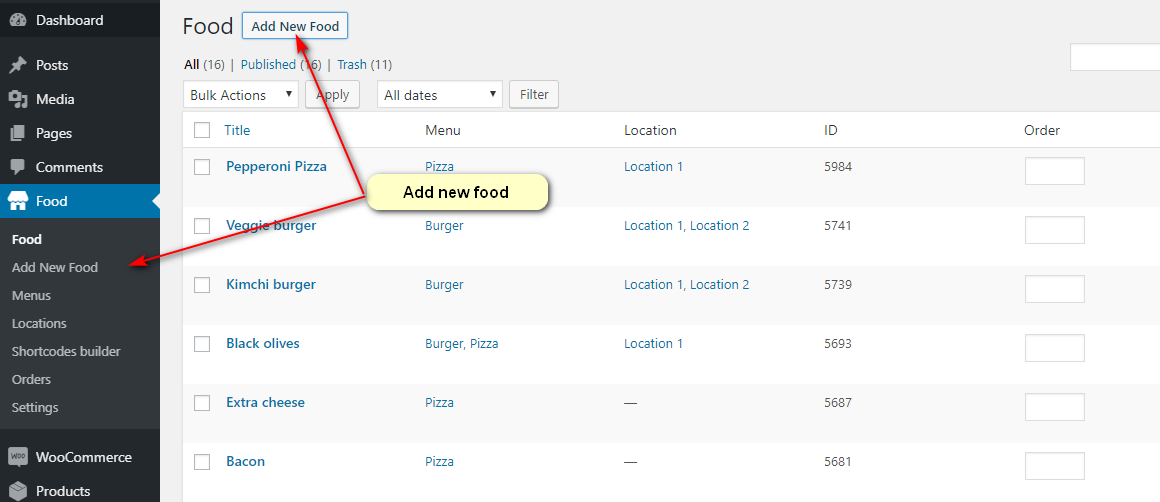
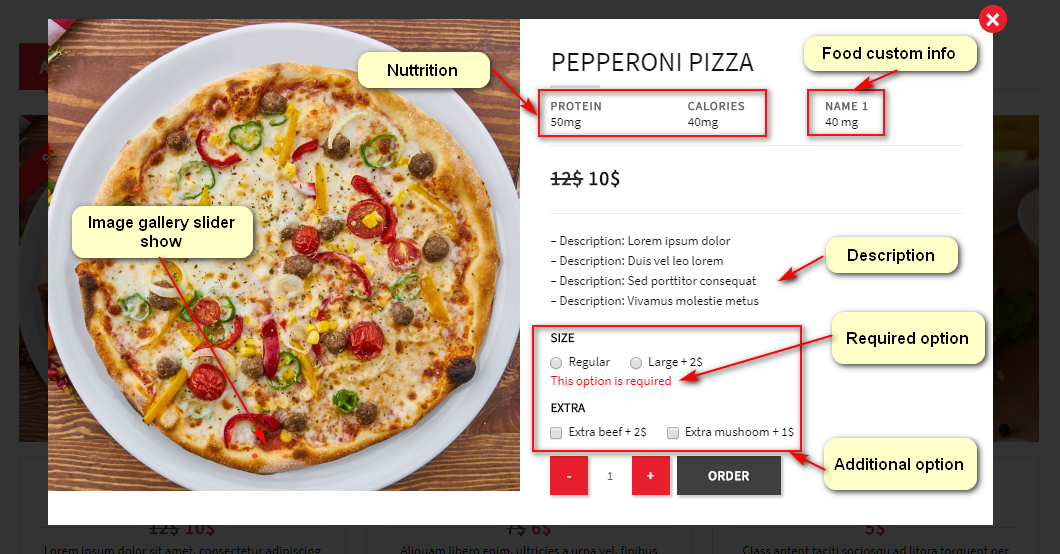
Creating Food
1. Go To WordPress Admin > Food > Add New Food
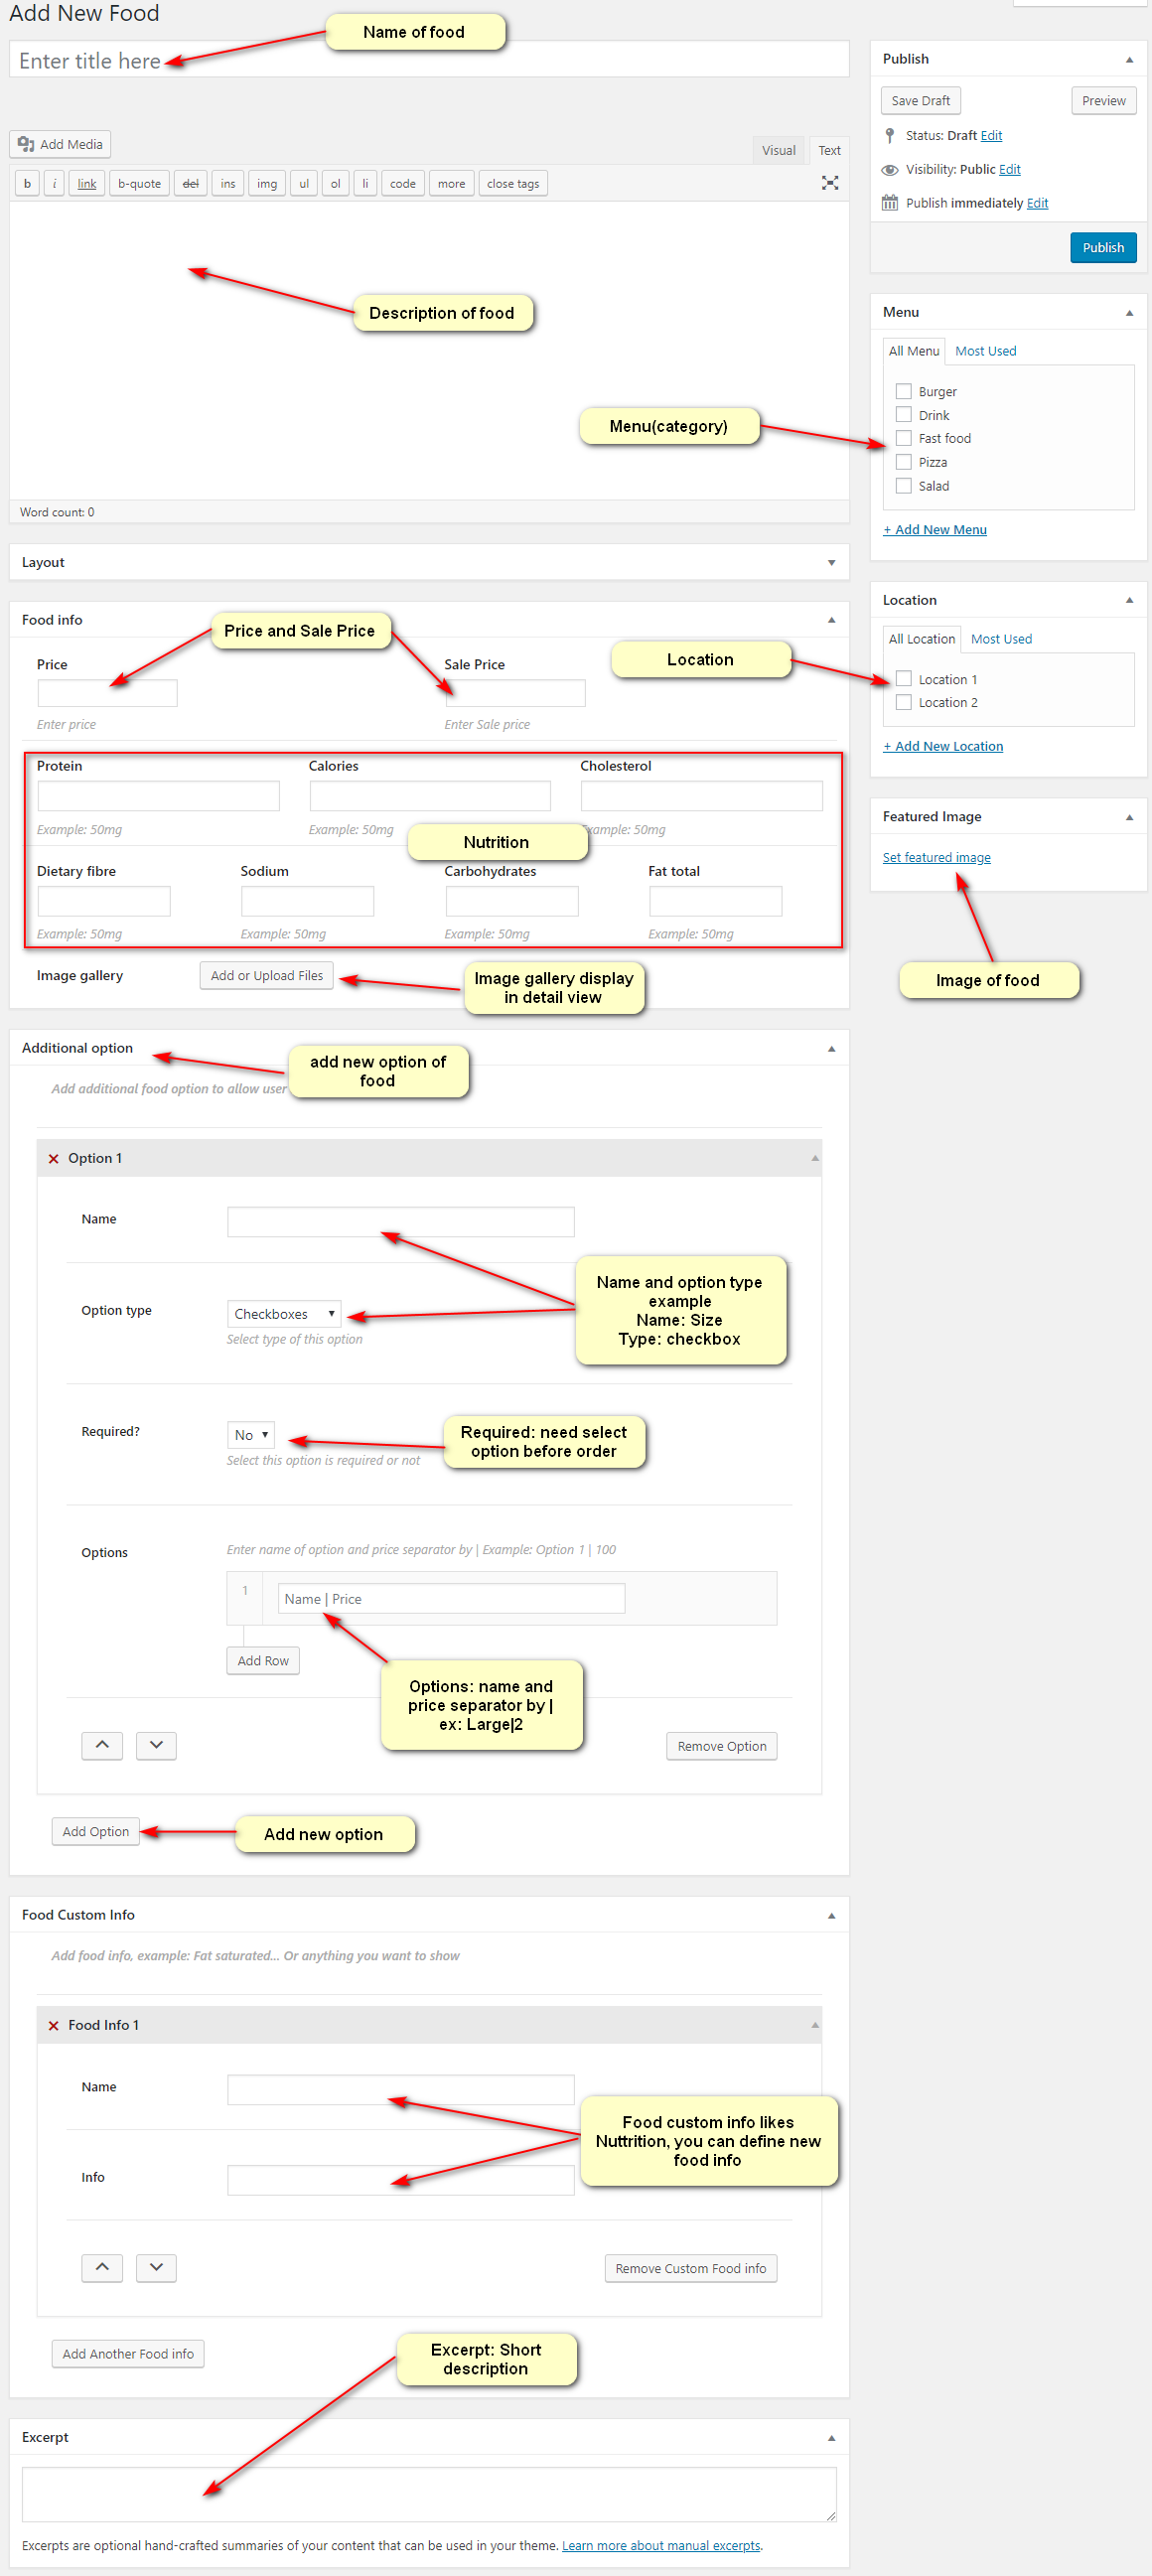
2. Set a title, description, featured image and required field about food
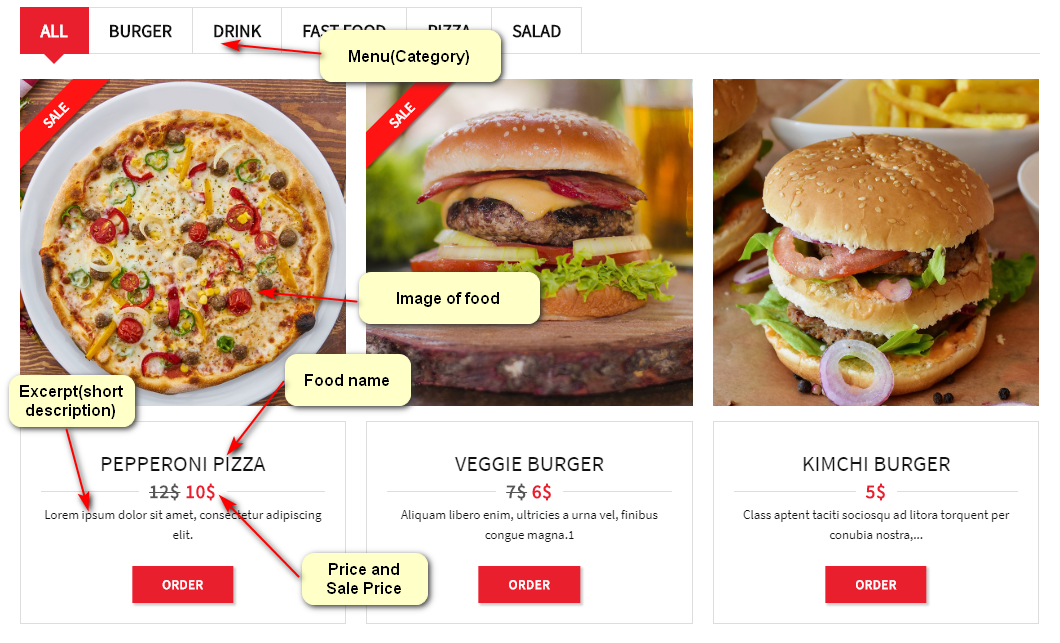
3. Display
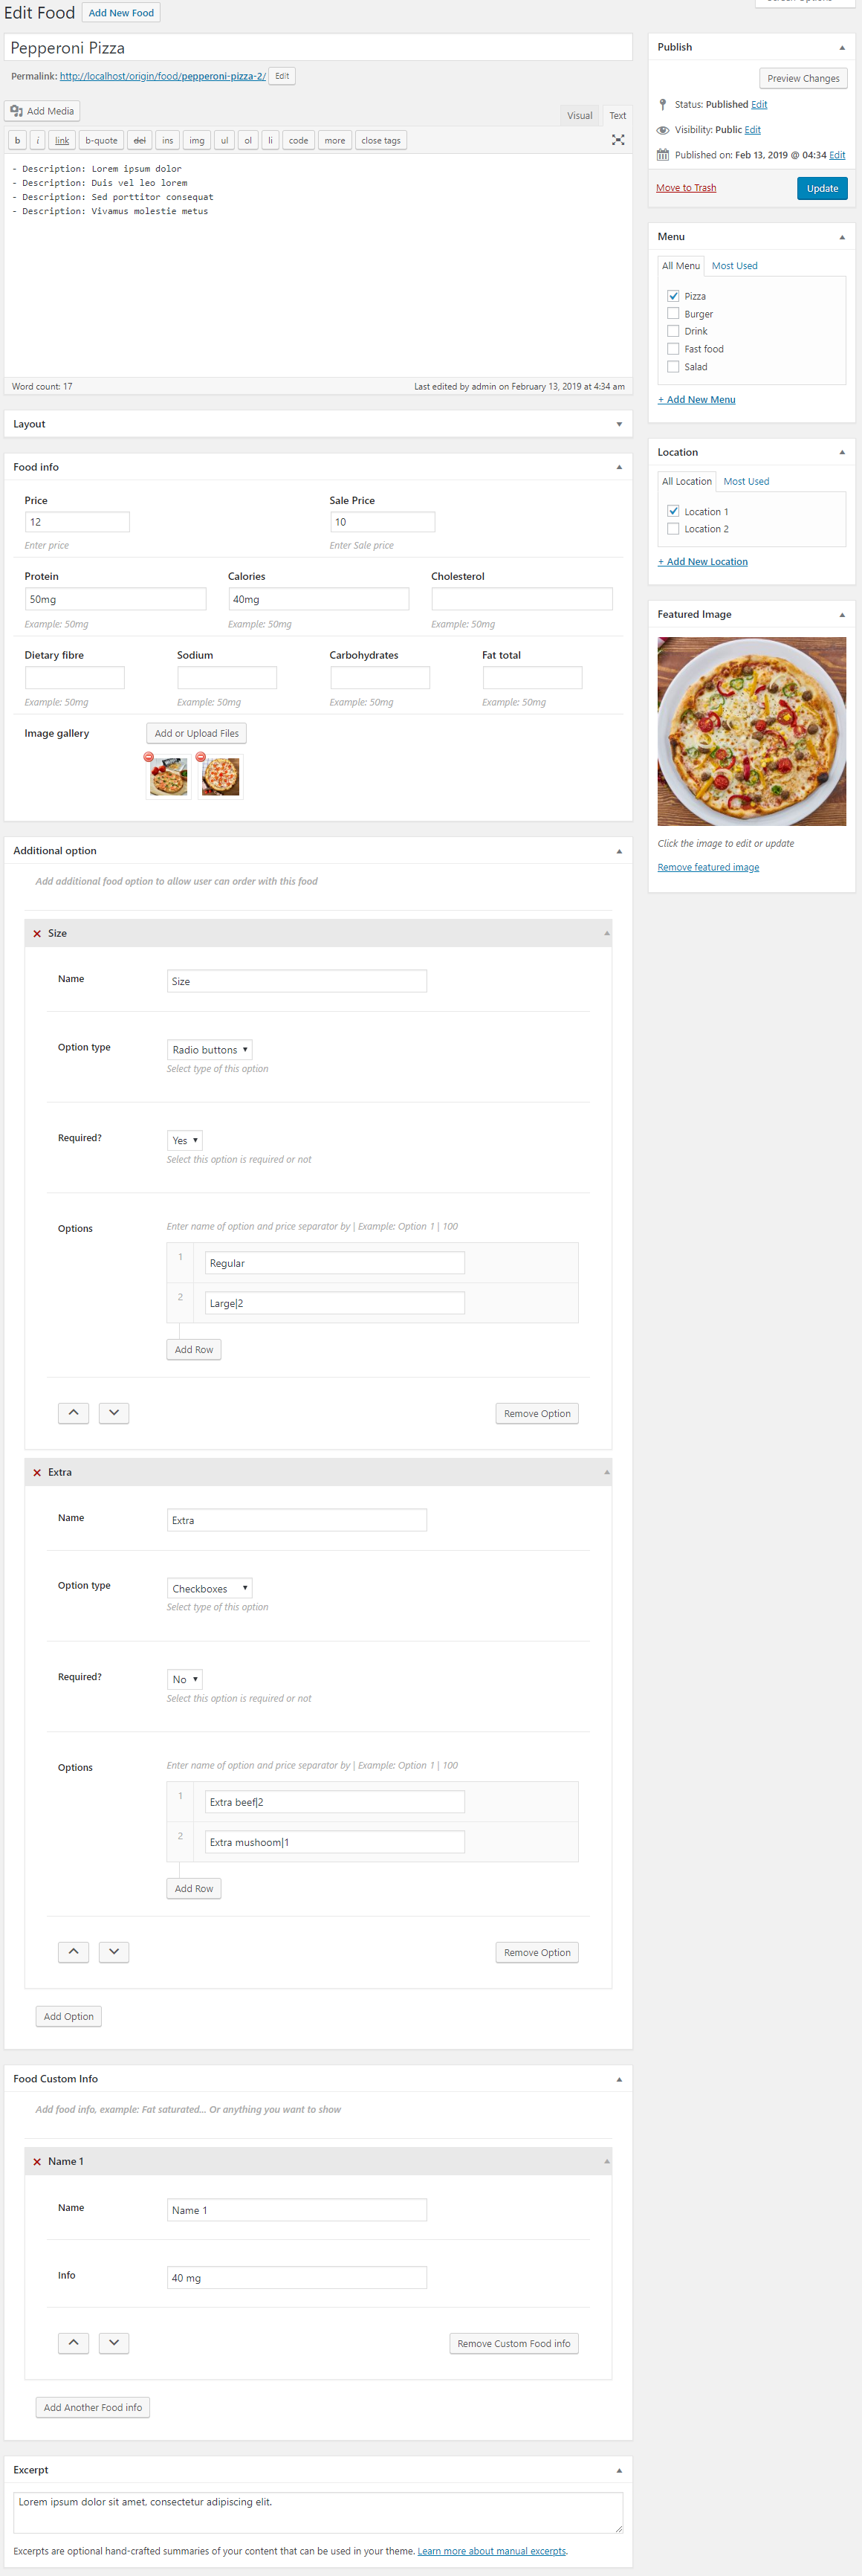
Edit Food information detail
1. Go To WordPress Admin > Food
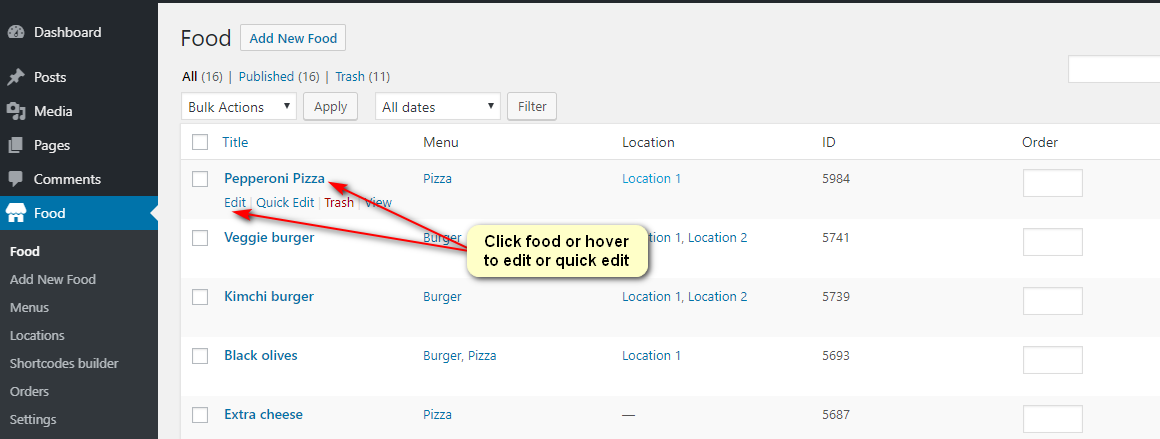
2. Click title to edit each food, after edit press update button to finish
Integrate Woocommerce
1. Go To WordPress Admin > Food -> Setting -> General -> Food ordering via -> Woocommerce
2. Create food and integrate with woocommerce
Creating, Editing Menus(Category)
Create menu
Go To WordPress Admin > Food > Menus > Input name, slug, description and press Add new menu button
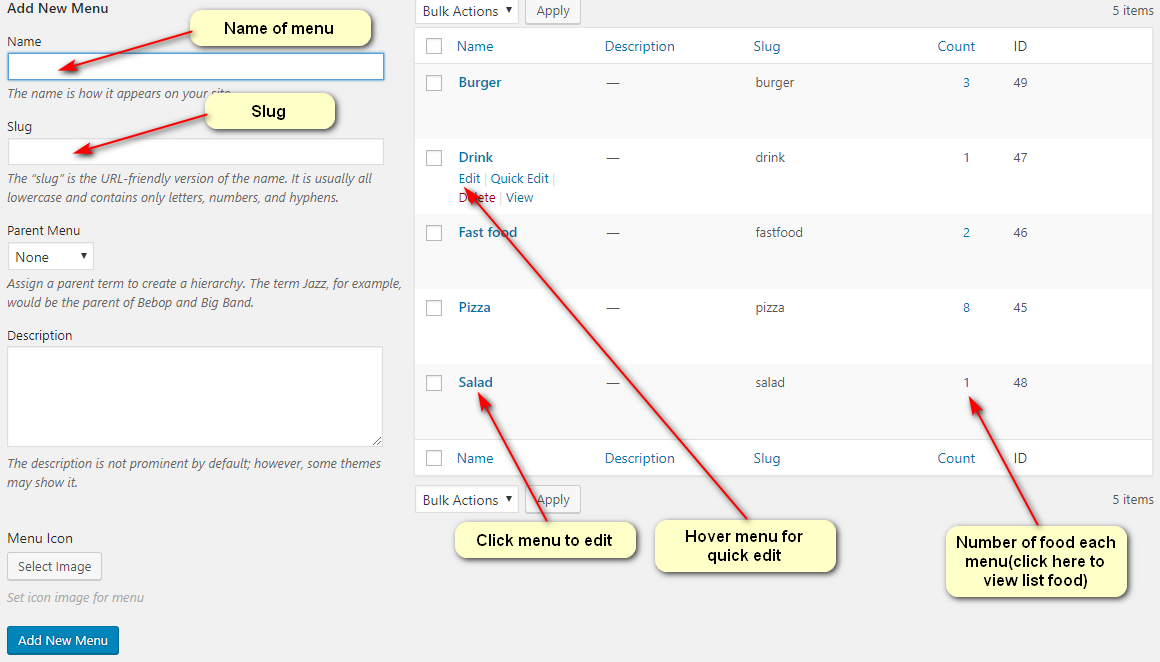
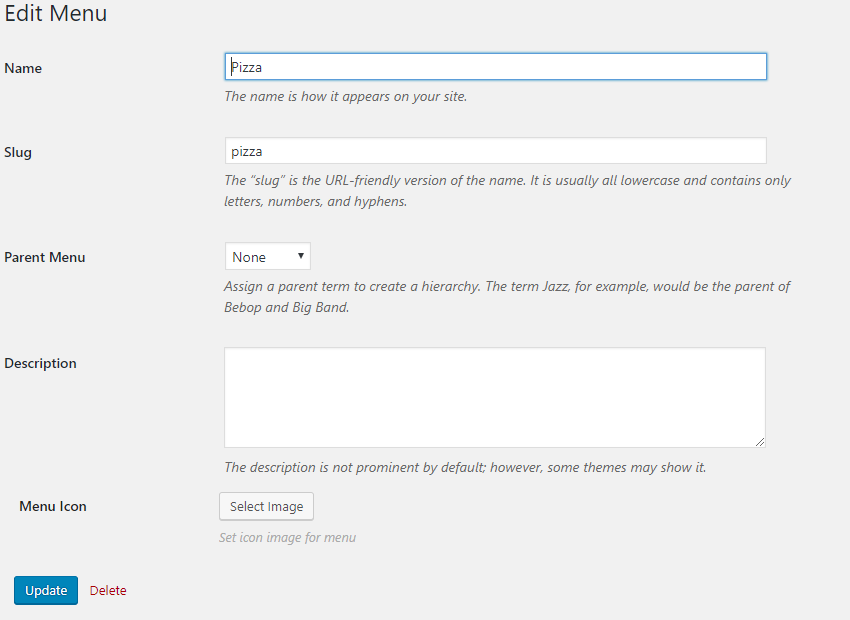
Edit menu
1. Click name of menu to edit menu detail
 2. Hover name of menu to quick edit menu detail
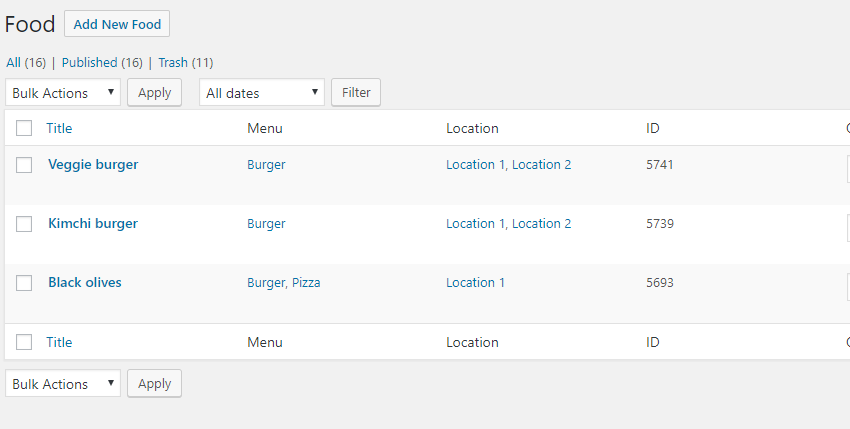
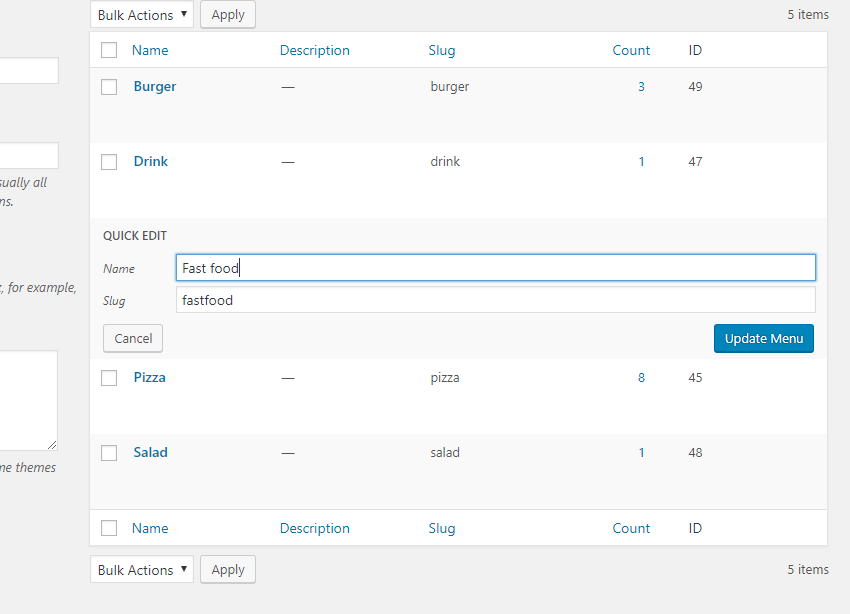 3. Click count of each menu to view list food in this menu
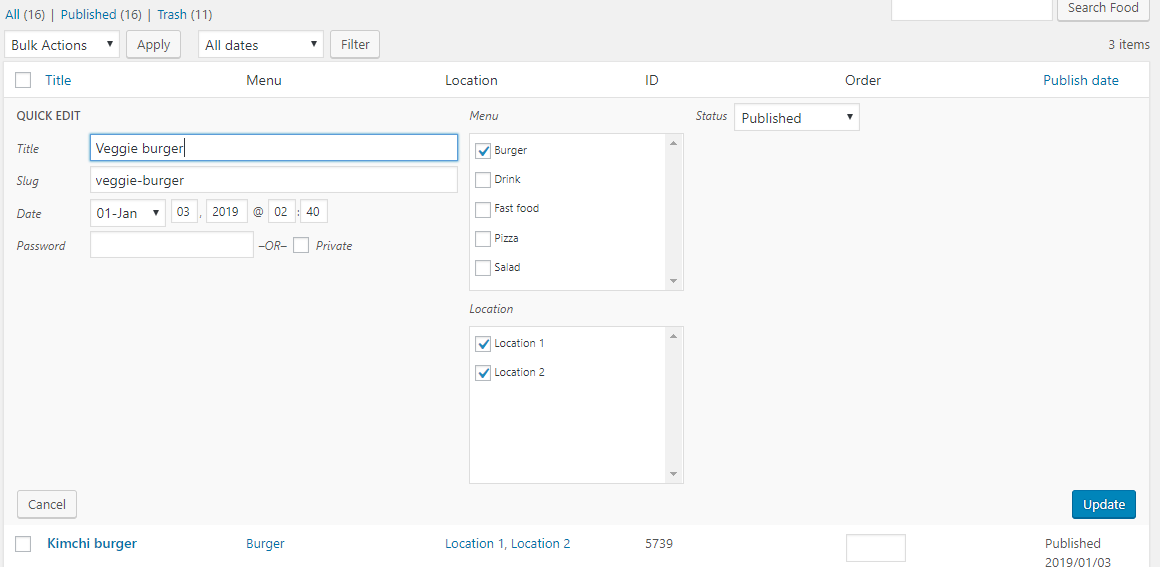
 4. Hover name of food to quick edit menu
Manage Location
Create Location
Go To WordPress Admin > Food > Locations > Input name, slug, description and press Add new Location button
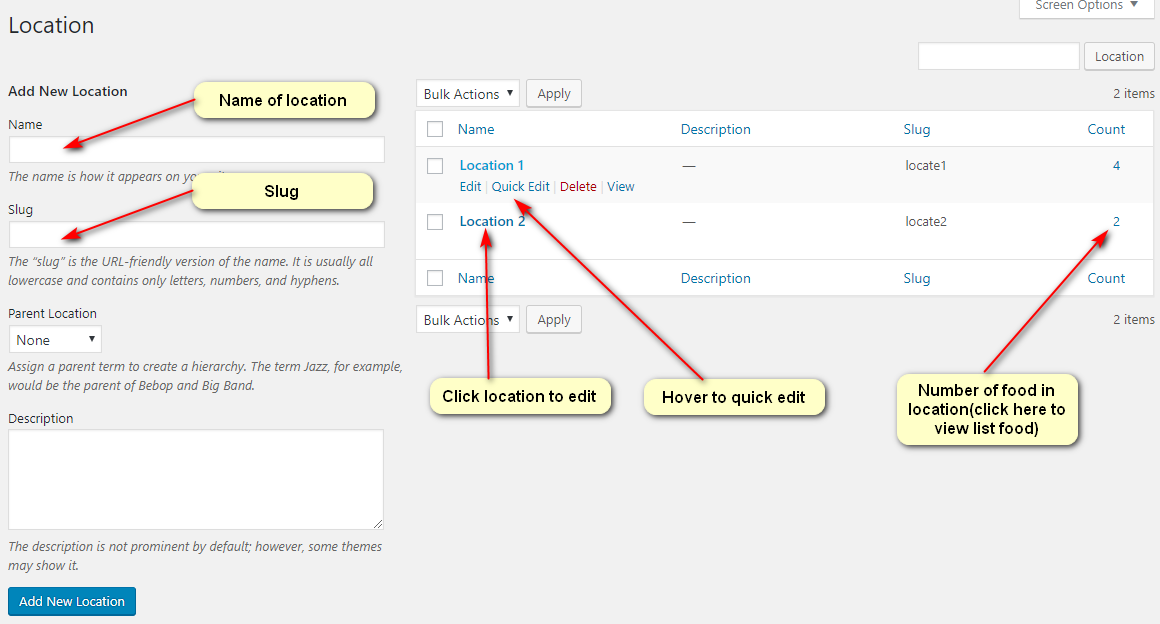
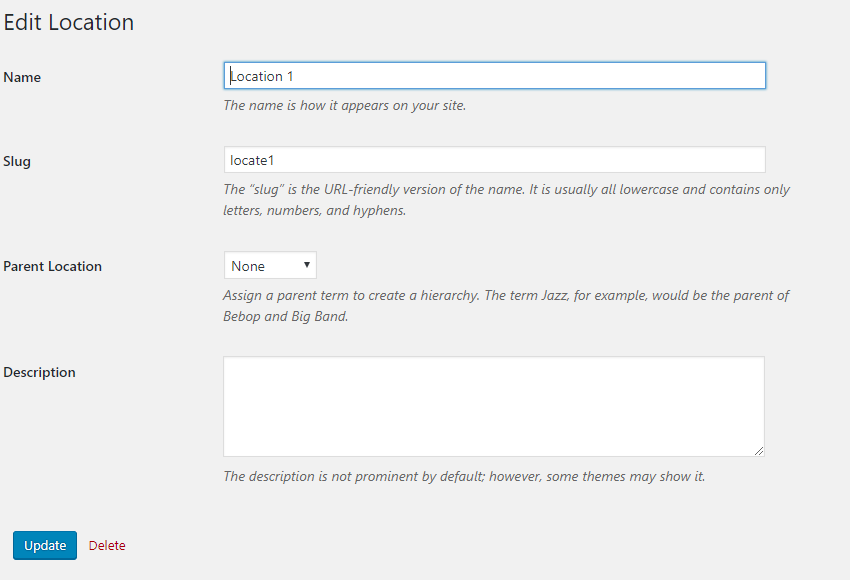
Edit Location
1. Click name of Location to edit Location detail
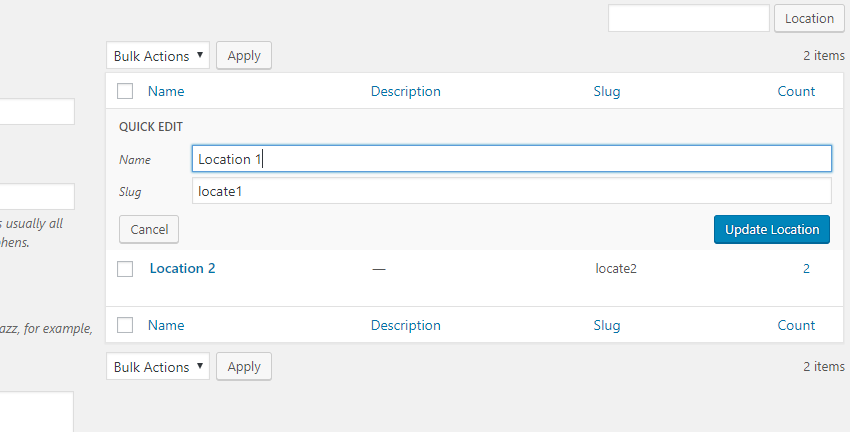
 2. Hover name of Location to quick edit Location detail
 3. Click count of each Location to view list food in this Location
 4. Hover name of food to quick edit location
5. Display
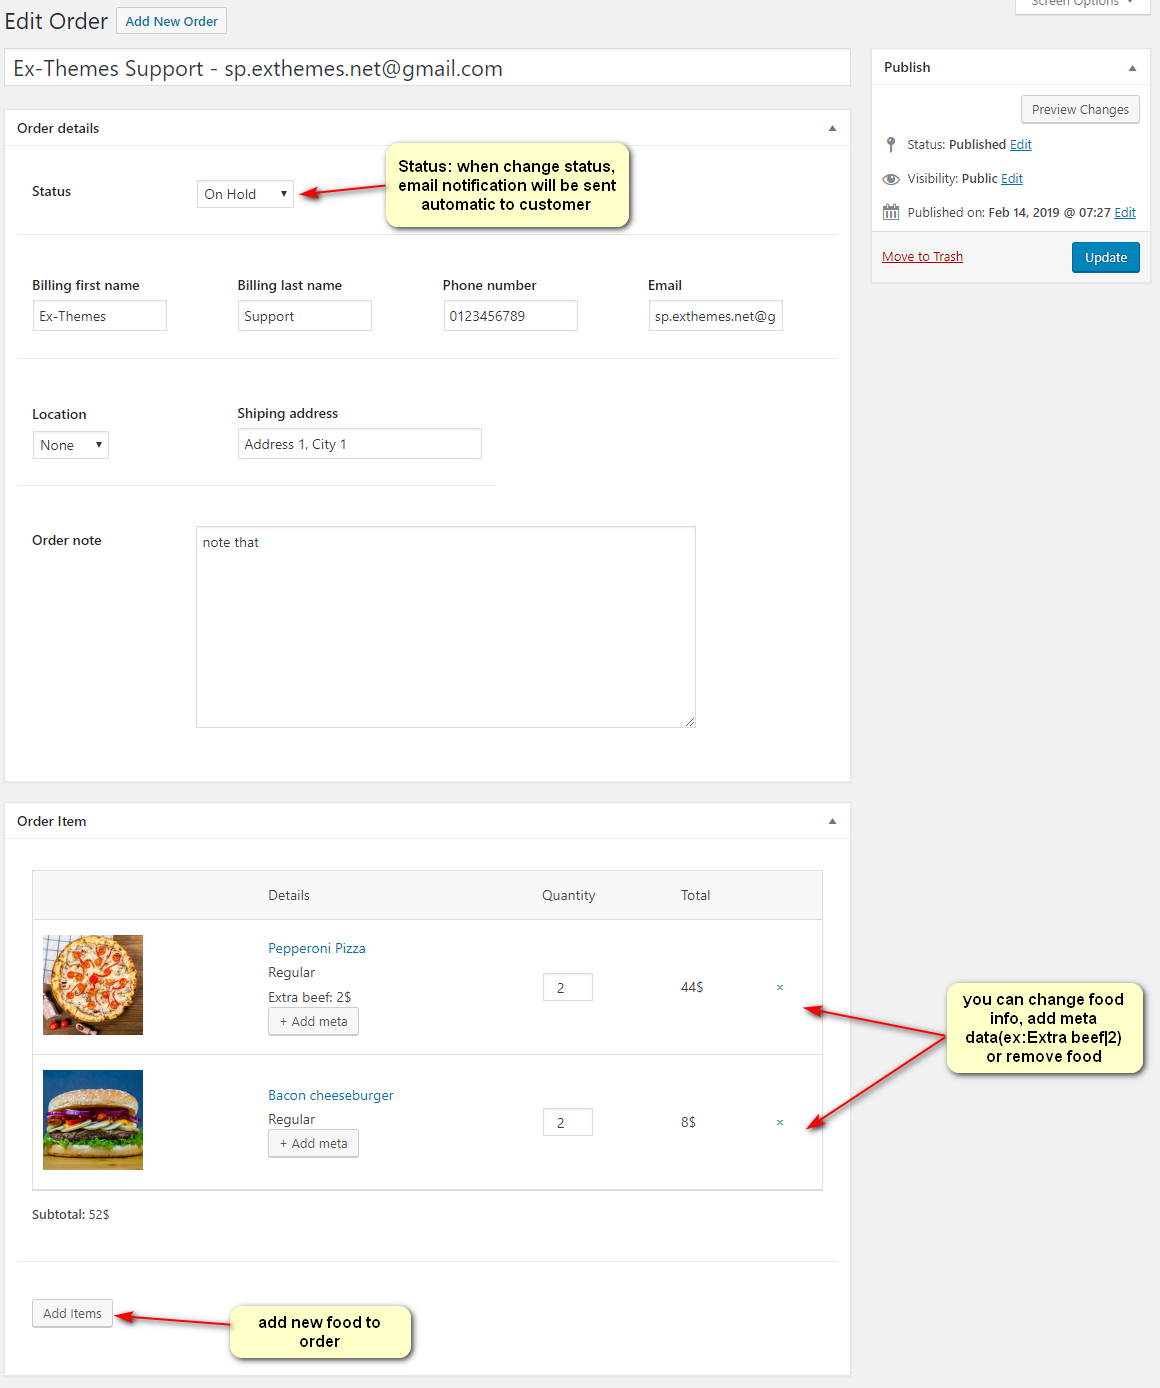
Manage Order
View and Edit Order
1. Click email of order to view and edit order detail
 2. Edit order information(note: when you change Order Status, email notification will be sent automatic to customer)
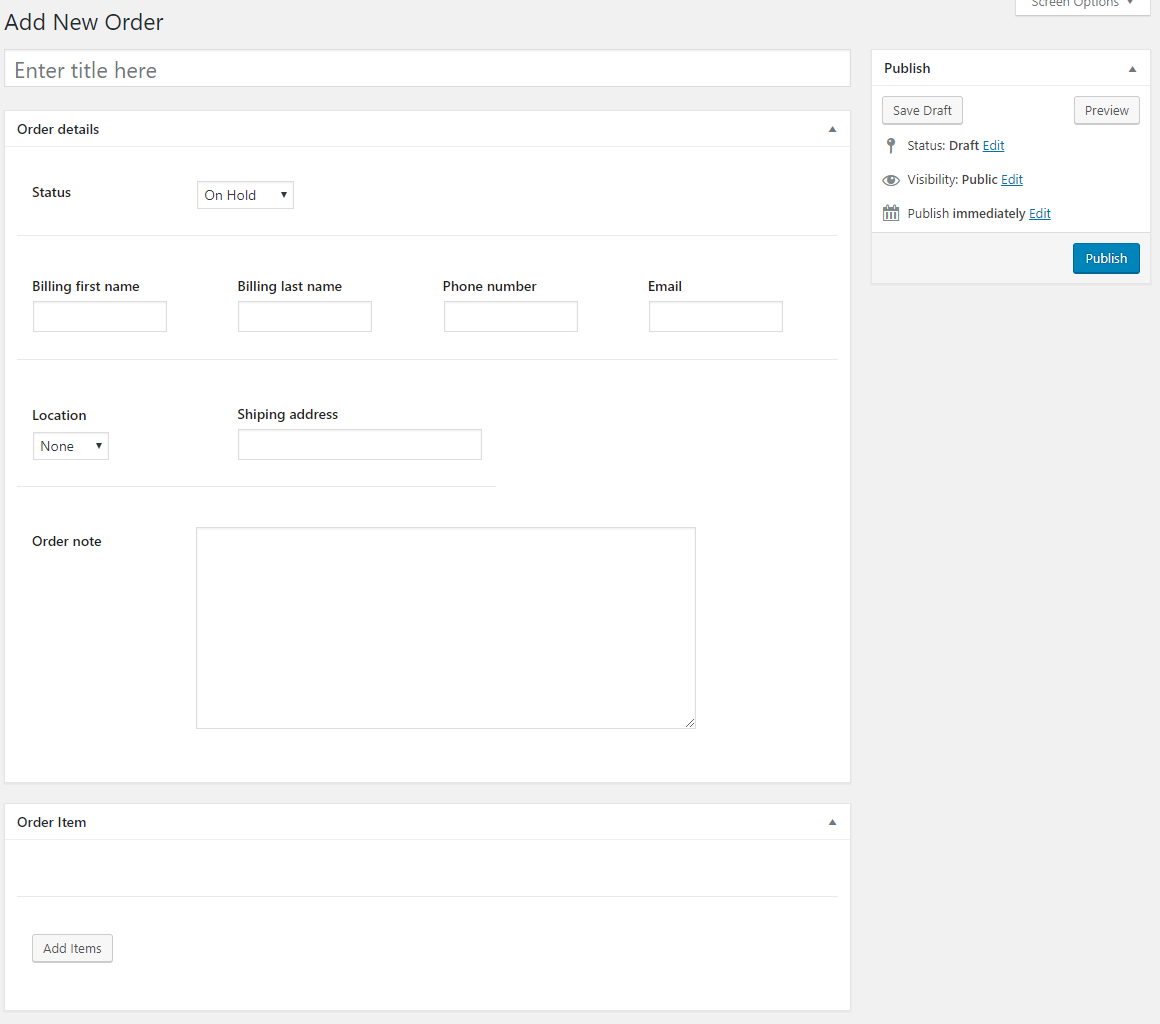
Create Order
Go To WordPress Admin > Food > Order > Add new Order
Shortcode
You could use Shortcode builder feature to generate shortcode instead using default shortcode
WP-Food shortcode also has supported: Visual Composer, Elementor and SiteOrigin page builder so you could use those page builder to config shortcode
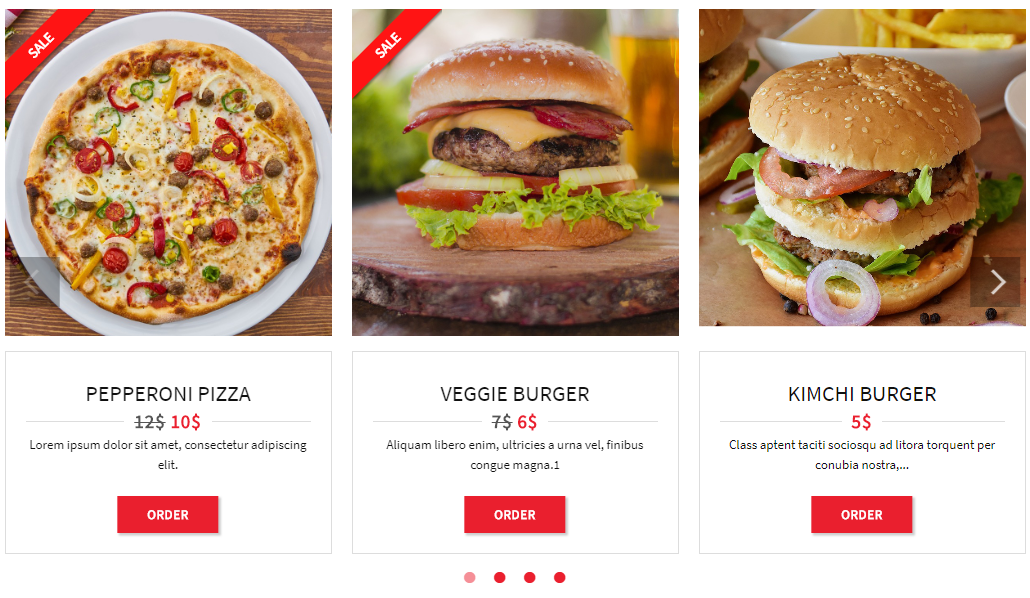
Food Grid
Food Grid is a shortcode for displaying food on grid.
- style – Select number style(Default 1)
- Food grid – stye start 1 to 4 (example style=”1″)
- column – A number of items to show per line, start 2 to 5. Default 2(Note: with grid style 3 only support 2 and 3 column)
- count – A number items will be showed. Default total items(Example: you have 23 foods but you only want to display 20 foods, you can set count=”20″)
- posts_per_page – relates param page_navi
- page_navi=”loadmore”, posts_per_page is number of items to add in the end after event load more (Example page_navi=”loadmore” posts_per_page=”3″ – show 3 items in the end after click button load more)
- page_navi=”” (Pagination), posts_per_page is number of items to show per page(Example page_navi=”” posts_per_page=”3″ – show 3 items in per page).
- ids – List of IDs to query, separated by a comma(example ids=”1,2,3″)
- cat – List of category ids (or slug), separated by a comma(example cat=”fastfood” or cat=”1″)
- menu_filter – Show category food filter(Default hidden)
- menu_filter=”hide”
- menu_filter=”show”
- order_cat – Show category food filter with custom order(Default no custom order)
- order_cat=””, not apply custom order
- order_cat=”yes” , apply custom order
- on_sale – Select items on sale(Default “”)
- on_sale=””,
- on_sale=”yes” , apply select items on sale
- page_navi – type of display(load more event or pagination) refer with param posts_per_page(Default Pagination)
- page_navi=”loadmore”, add items in the end after event load more
- page_navi=”” ,Pagination
- number_excerpt – Enter number of excerpt to show(Default 10), example number_excerpt=”20″
- cart_enable – Enable cart icon or not(Default yes)
- cart_enable=”yes”, enable
- cart_enable=”no” ,not enable
- order – Order ascending (order=”ASC”) or descending (order=”DESC”)
- orderby – Choose order condition
- ‘date’ – Order by date.
- ‘ID’ – Order by post id. Note the captialization.
- ‘author’ – Order by author.
- ‘title’ – Order by title.
- ‘name’ – Order by post name (post slug).
- ‘modified’ – Order by last modified date.
- ‘parent’ – Order by post/page parent id.
- ‘rand’ – Random order.
- ‘menu_order’ – Order by Page Order. Used most often for Pages (Order field in the Edit Page Attributes box) and for Attachments (the integer fields in the Insert / Upload Media Gallery dialog), but could be used for any post type with distinct ‘menu_order’ values (they all default to 0).
- ‘meta_value’ – Note that a ‘meta_key=keyname’ must also be present in the query. Note also that the sorting will be alphabetical which is fine for strings (i.e. words), but can be unexpected for numbers (e.g. 1, 3, 34, 4, 56, 6, etc, rather than 1, 3, 4, 6, 34, 56 as you might naturally expect). Use ‘meta_value_num’ instead for numeric values.
- ‘meta_value_num’ – Order by numeric meta value (available with Version 2.8). Also note that a ‘meta_key=keyname’ must also be present in the query. This value allows for numerical sorting as noted above in ‘meta_value’.
- ‘post__in’ – Preserve post ID order given in the ids array
- ‘none’ – No order
- meta_key – Enter custom field key, Show posts associated with a certain custom field
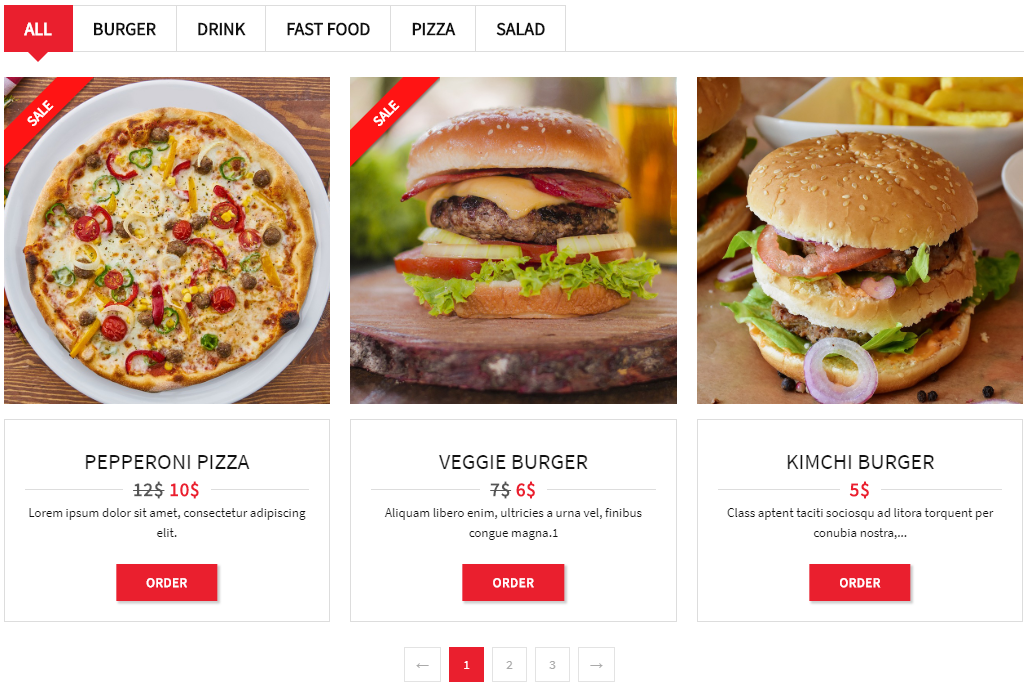
Example: Style 2 (3 columns) with Category and Pagination(click here to view detail demo)
Food list
Food list is a shortcode for displaying food on listing .
- style – Select number style start 1 to 3(example style=”1″)
- count – A number items will be showed. Default total items(Example: you have 23 foods but you only want to display 20 foods, you can set count=”20″)
- posts_per_page – relates param page_navi
- page_navi=”loadmore”, posts_per_page is number of items to add in the end after event load more (Example page_navi=”loadmore” posts_per_page=”3″ – show 3 items in the end after click button load more)
- page_navi=”” (Pagination), posts_per_page is number of items to show per page(Example page_navi=”” posts_per_page=”3″ – show 3 items in per page).
- ids – List of IDs to query, separated by a comma(example ids=”1,2,3″)
- cat – List of category ids (or slug), separated by a comma(example cat=”fastfood” or cat=”1″)
- menu_filter – Show category food filter(Default hidden)
- menu_filter=”hide”
- menu_filter=”show”
- order_cat – Show category food filter with custom order(Default no custom order)
- order_cat=””, not apply custom order
- order_cat=”yes” , apply custom order
- on_sale – Select items on sale(Default “”)
- on_sale=””,
- on_sale=”yes” , apply select items on sale
- menu_pos – Position of category box(Default top)
- menu_pos=”top”, Show category in top
- menu_pos=”left”, Show category in left side
- page_navi – type of display(load more event or pagination) refer with param posts_per_page
- page_navi=”loadmore”, add items in the end after event load more
- page_navi=”” ,Pagination
- cart_enable – Enable cart icon or not(Default yes)
- cart_enable=”yes”, enable
- cart_enable=”no” ,not enable
- number_excerpt – Enter number of excerpt to show(Default 10), example number_excerpt=”20″
- order – Order ascending (order=”ASC”) or descending (order=”DESC”)
- orderby – Choose order condition
- ‘date’ – Order by date.
- ‘ID’ – Order by post id. Note the captialization.
- ‘author’ – Order by author.
- ‘title’ – Order by title.
- ‘name’ – Order by post name (post slug).
- ‘modified’ – Order by last modified date.
- ‘parent’ – Order by post/page parent id.
- ‘rand’ – Random order.
- ‘menu_order’ – Order by Page Order. Used most often for Pages (Order field in the Edit Page Attributes box) and for Attachments (the integer fields in the Insert / Upload Media Gallery dialog), but could be used for any post type with distinct ‘menu_order’ values (they all default to 0).
- ‘meta_value’ – Note that a ‘meta_key=keyname’ must also be present in the query. Note also that the sorting will be alphabetical which is fine for strings (i.e. words), but can be unexpected for numbers (e.g. 1, 3, 34, 4, 56, 6, etc, rather than 1, 3, 4, 6, 34, 56 as you might naturally expect). Use ‘meta_value_num’ instead for numeric values.
- ‘meta_value_num’ – Order by numeric meta value (available with Version 2.8). Also note that a ‘meta_key=keyname’ must also be present in the query. This value allows for numerical sorting as noted above in ‘meta_value’.
- ‘post__in’ – Preserve post ID order given in the ids array
- ‘none’ – No order
- meta_key – Enter custom field key, Show posts associated with a certain custom field
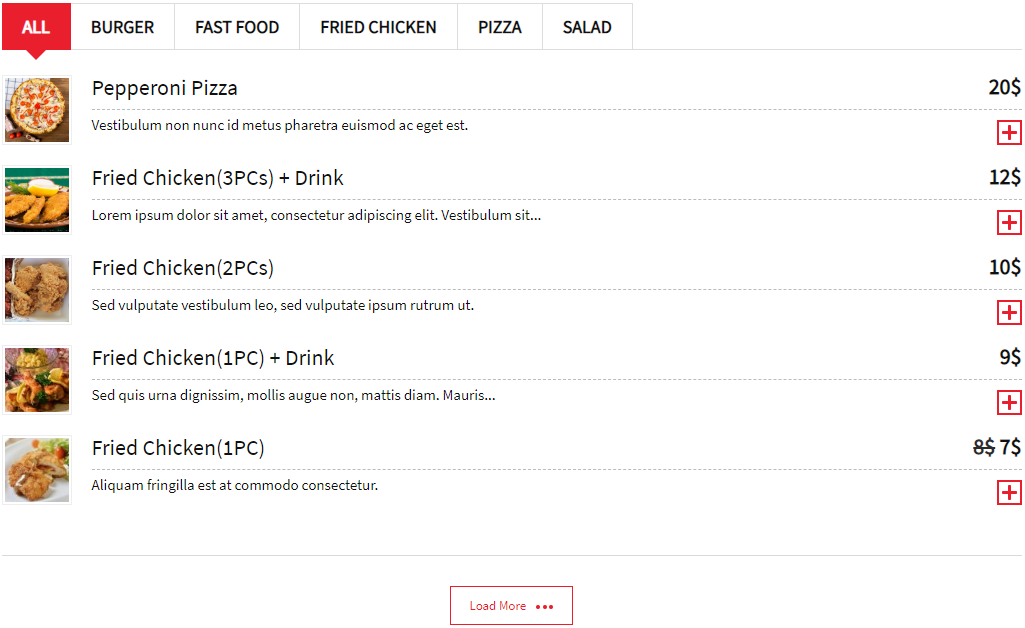
Example: List style 1 with Category and Load more(click here to view detail demo)
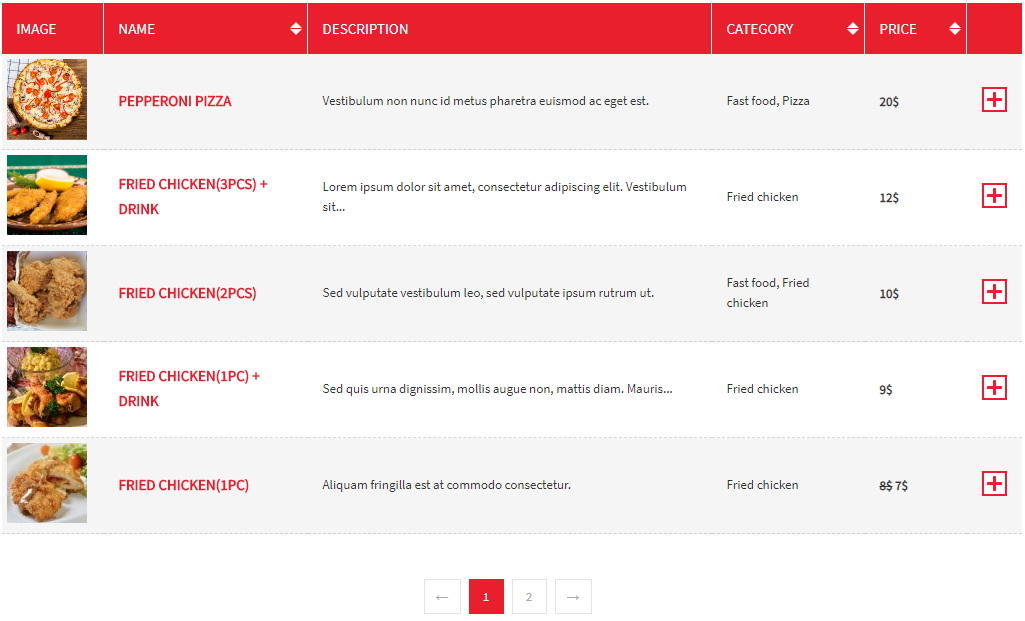
Food Table
Food Table is a shortcode for displaying food on table .
- style – Select number style(Default 1)
- Food table – only have style 1 (example style=”1″)
- count – A number items will be showed. Default total items(Example: you have 23 foods but you only want to display 20 foods, you can set count=”20″)
- posts_per_page – relates param page_navi
- page_navi=”loadmore”, posts_per_page is number of items to add in the end after event load more (Example page_navi=”loadmore” posts_per_page=”3″ – show 3 items in the end after click button load more)
- page_navi=”” (Pagination), posts_per_page is number of items to show per page(Example page_navi=”” posts_per_page=”3″ – show 3 items in per page).
- ids – List of IDs to query, separated by a comma(example ids=”1,2,3″)
- cat – List of category ids (or slug), separated by a comma(example cat=”fastfood” or cat=”1″)
- menu_filter – Show category food filter(Default hidden)
- menu_filter=”hide”
- menu_filter=”show”
- order_cat – Show category food filter with custom order(Default no custom order)
- order_cat=””, not apply custom order
- order_cat=”yes” , apply custom order
- on_sale – Select items on sale(Default “”)
- on_sale=””,
- on_sale=”yes” , apply select items on sale
- live_sort – Show or hide sort(Default hidden)
- live_sort=”” – hide
- live_sort=”1″ – show
- page_navi – type of display(load more event or pagination) refer with param posts_per_page(Default Pagination)
- page_navi=”loadmore”, add items in the end after event load more
- page_navi=”” ,Pagination
- number_excerpt – Enter number of excerpt to show(Default 10), example number_excerpt=”20″
- cart_enable – Enable cart icon or not(Default yes)
- cart_enable=”yes”, enable
- cart_enable=”no” ,not enable
- order – Order ascending (order=”ASC”) or descending (order=”DESC”)
- orderby – Choose order condition
- ‘date’ – Order by date.
- ‘ID’ – Order by post id. Note the captialization.
- ‘author’ – Order by author.
- ‘title’ – Order by title.
- ‘name’ – Order by post name (post slug).
- ‘modified’ – Order by last modified date.
- ‘parent’ – Order by post/page parent id.
- ‘rand’ – Random order.
- ‘menu_order’ – Order by Page Order. Used most often for Pages (Order field in the Edit Page Attributes box) and for Attachments (the integer fields in the Insert / Upload Media Gallery dialog), but could be used for any post type with distinct ‘menu_order’ values (they all default to 0).
- ‘meta_value’ – Note that a ‘meta_key=keyname’ must also be present in the query. Note also that the sorting will be alphabetical which is fine for strings (i.e. words), but can be unexpected for numbers (e.g. 1, 3, 34, 4, 56, 6, etc, rather than 1, 3, 4, 6, 34, 56 as you might naturally expect). Use ‘meta_value_num’ instead for numeric values.
- ‘meta_value_num’ – Order by numeric meta value (available with Version 2.8). Also note that a ‘meta_key=keyname’ must also be present in the query. This value allows for numerical sorting as noted above in ‘meta_value’.
- ‘post__in’ – Preserve post ID order given in the ids array
- ‘none’ – No order
- meta_key – Enter custom field key, Show posts associated with a certain custom field
Example: Table style with Live Sort and Pagination(click here to view detail demo)
Food Carousel
Food Carousel is a shortcode for displaying food on slider .
- style – Select number style start 1 to 4(example style=”1″)
- count – A number items will be showed. Default total items(Example: you have 23 foods but you only want to display 20 foods, you can set count=”20″)
- slidesshow – number items per slide (Default:3)
- slidesscroll – number of slides to scroll at a time (Default = slidesshow)
- ids – List of IDs to query, separated by a comma(example ids=”1,2,3″)
- cat – List of category ids (or slug), separated by a comma(example cat=”fastfood” or cat=”1″)
- on_sale – Select items on sale(Default “”)
- on_sale=””,
- on_sale=”yes” , apply select items on sale
- number_excerpt – Enter number of excerpt to show(Default 10), example number_excerpt=”20″
- order – Order ascending (order=”ASC”) or descending (order=”DESC”)
- orderby – Choose order condition
- ‘date’ – Order by date.
- ‘ID’ – Order by post id. Note the captialization.
- ‘author’ – Order by author.
- ‘title’ – Order by title.
- ‘name’ – Order by post name (post slug).
- ‘modified’ – Order by last modified date.
- ‘parent’ – Order by post/page parent id.
- ‘rand’ – Random order.
- ‘menu_order’ – Order by Page Order. Used most often for Pages (Order field in the Edit Page Attributes box) and for Attachments (the integer fields in the Insert / Upload Media Gallery dialog), but could be used for any post type with distinct ‘menu_order’ values (they all default to 0).
- ‘meta_value’ – Note that a ‘meta_key=keyname’ must also be present in the query. Note also that the sorting will be alphabetical which is fine for strings (i.e. words), but can be unexpected for numbers (e.g. 1, 3, 34, 4, 56, 6, etc, rather than 1, 3, 4, 6, 34, 56 as you might naturally expect). Use ‘meta_value_num’ instead for numeric values.
- ‘meta_value_num’ – Order by numeric meta value (available with Version 2.8). Also note that a ‘meta_key=keyname’ must also be present in the query. This value allows for numerical sorting as noted above in ‘meta_value’.
- ‘post__in’ – Preserve post ID order given in the ids array
- ‘none’ – No order
- meta_key – Enter custom field key, Show posts associated with a certain custom field
- autoplay – Auto next slide or not
- autoplay=”” – not auto
- autoplay=”1″ – auto
- autoplayspeed – Autoplay Speed in milliseconds. Default:3000, it work only autoplay=”1″(example autoplay=”1″ autoplayspeed=”1000″)
- loading_effect – Enable or disable effect when loading
- loading_effect=”” – no effect
- loading_effect=”1″ – apply effect
- infinite – Infinite loop sliding ( go to first item when end loop)
- infinite=”” – not infinite
- infinite=”yes” – infinite
- cart_enable – Enable cart icon or not(Default yes)
- cart_enable=”yes”, enable
- cart_enable=”no” ,not enable
Example: Carousel style 2 with 3 items visible, Auto play(1 seconds) and Infinite( go to first item when end loop) click here to view detail demo
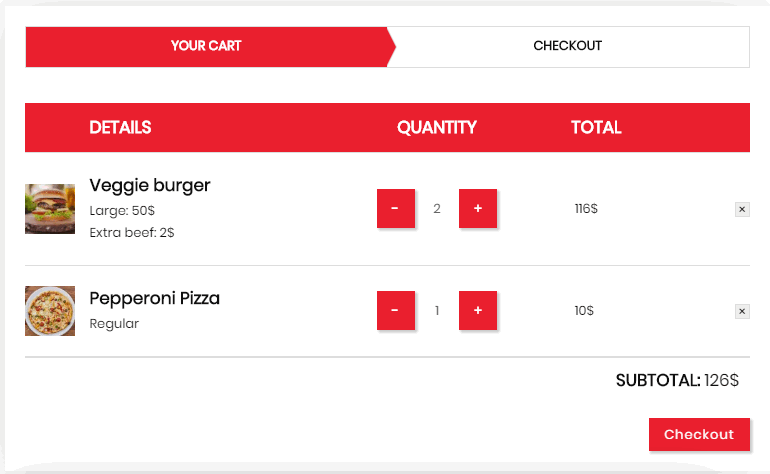
Food Cart
Food Cart is a shortcode for displaying food on Cart(This shortcode for cart page, you can choice any page and add this shortcode to that page, just setting that page to cart page, refer Advance setting)
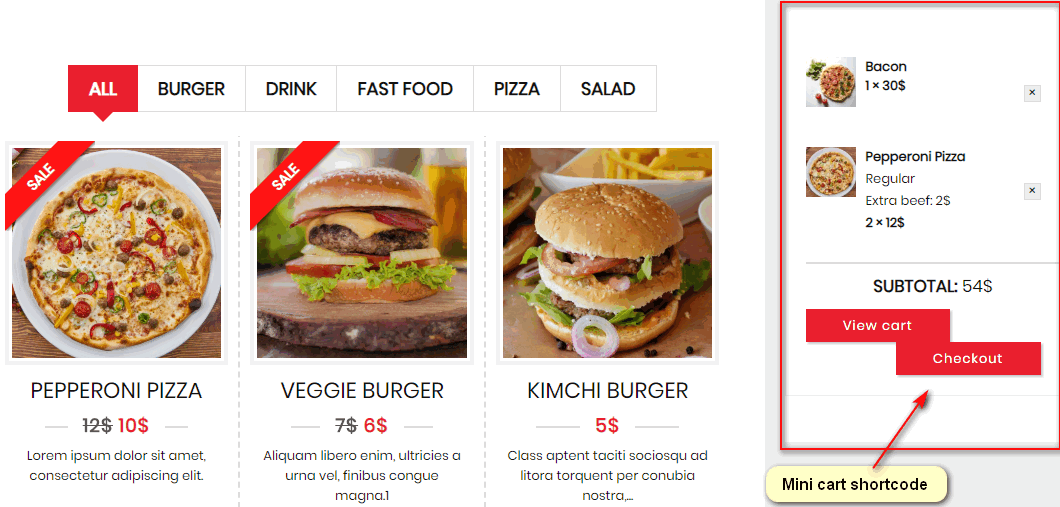
Food Mini Cart
Food Mini Cart is a shortcode for displaying food on Cart with small size, you can add it to any place or any widget replace for cart icon
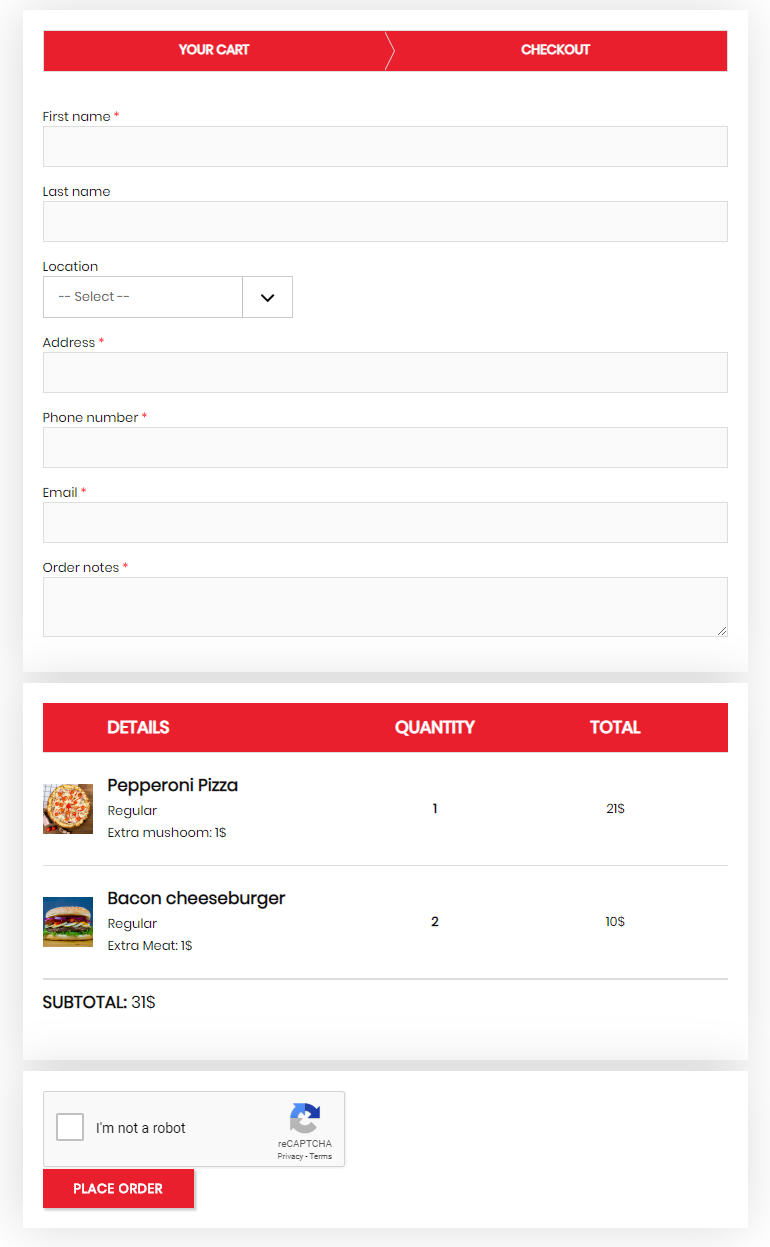
Food Checkout
Food Checkout is a shortcode for displaying checkout info(This shortcode for checkout page, you can choice any page and add this shortcode to that page, just setting that page to checkout page, refer Advance setting)
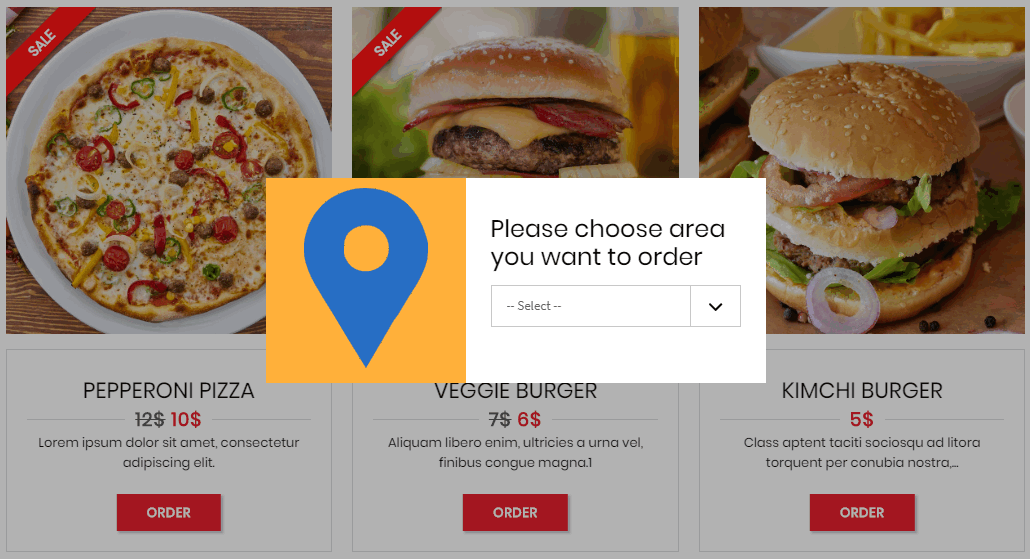
Food Location
Food Location is a shortcode for displaying Location selection.

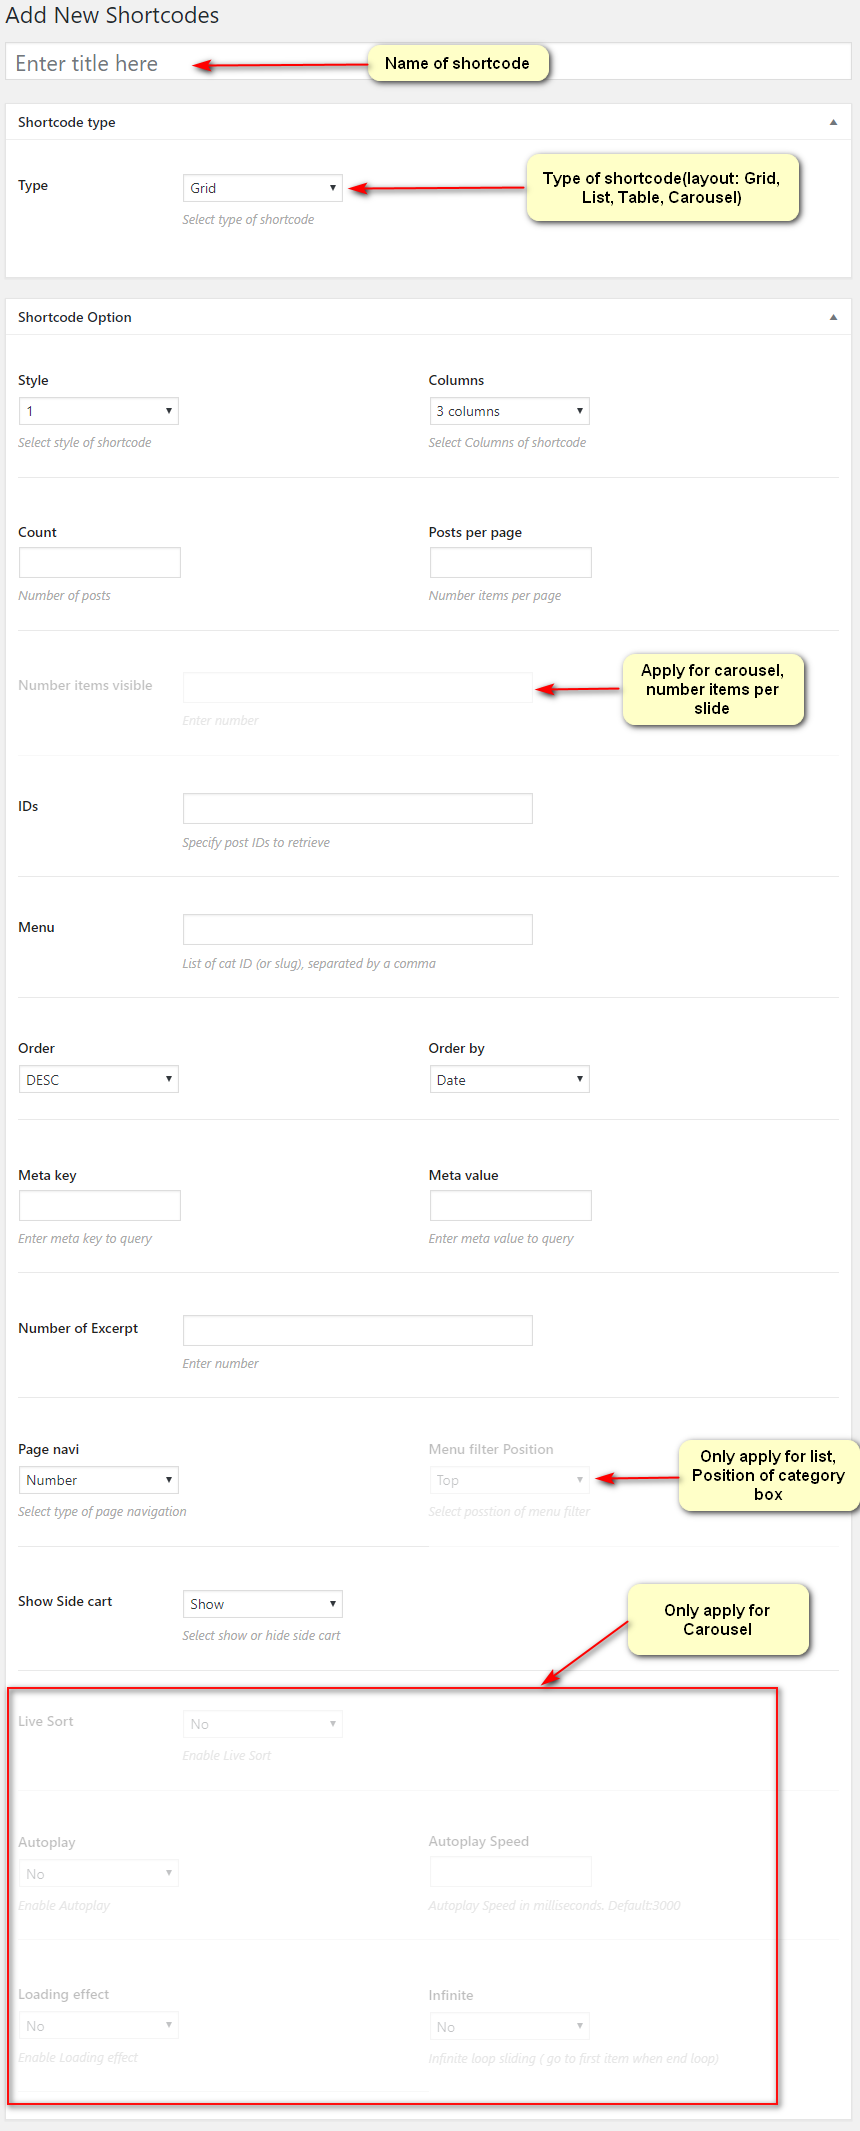
Shortcode builder
1. Go to Food > Shortcode builder
 2. Config shortcode option as you wan to show > Click Publish button
With Selection Tyle has 4 items(Grid,Table,List, Carousel) please refer Short code document for more detail about each param
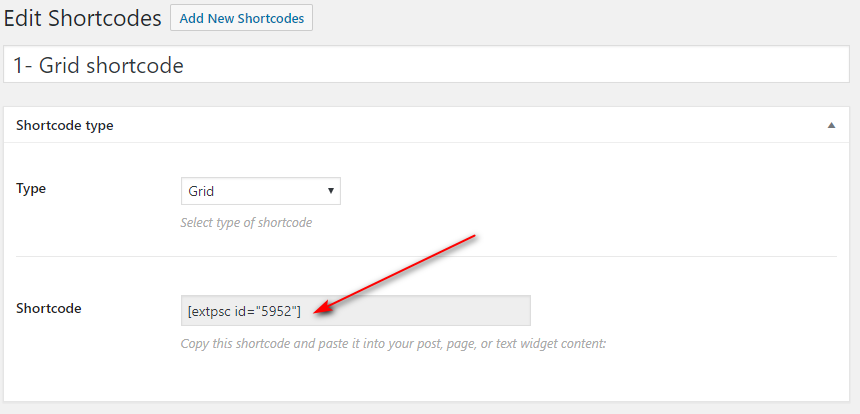
 3. Copy shortcode and paste it into your post, page, or text widget content
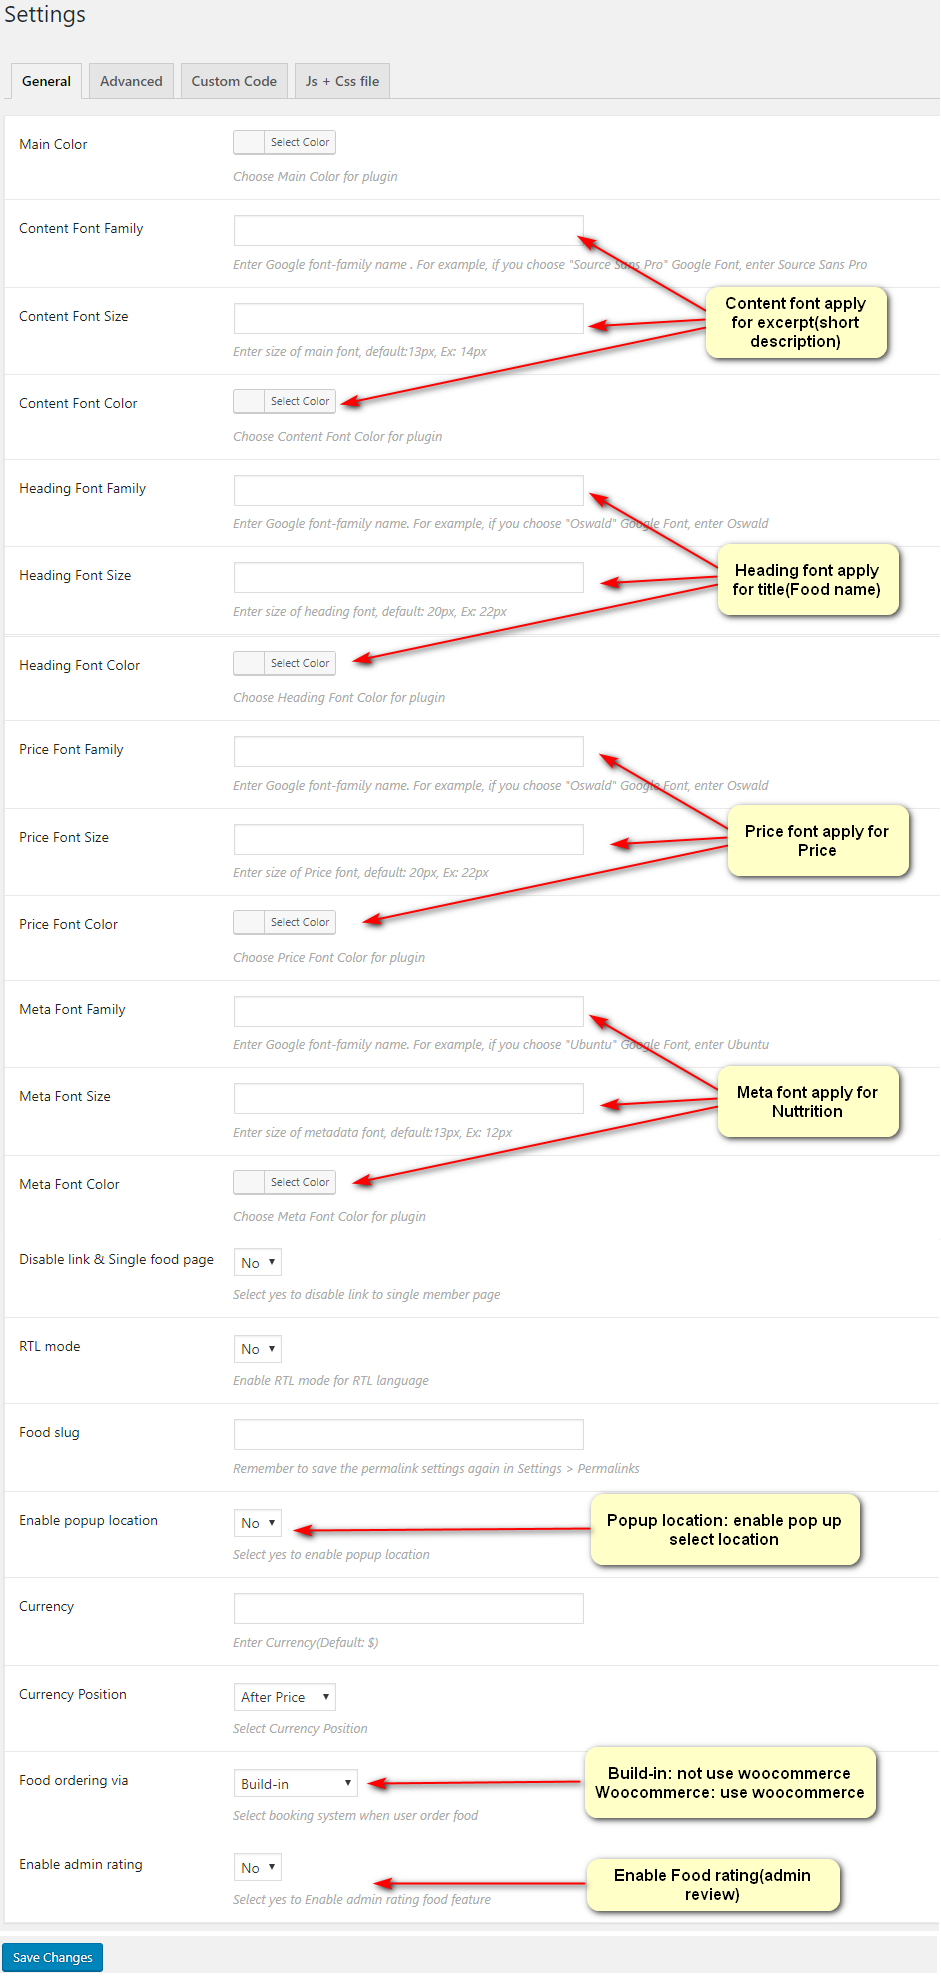
General Setting
1. Go to Food > Setting
 2. Advance Setting
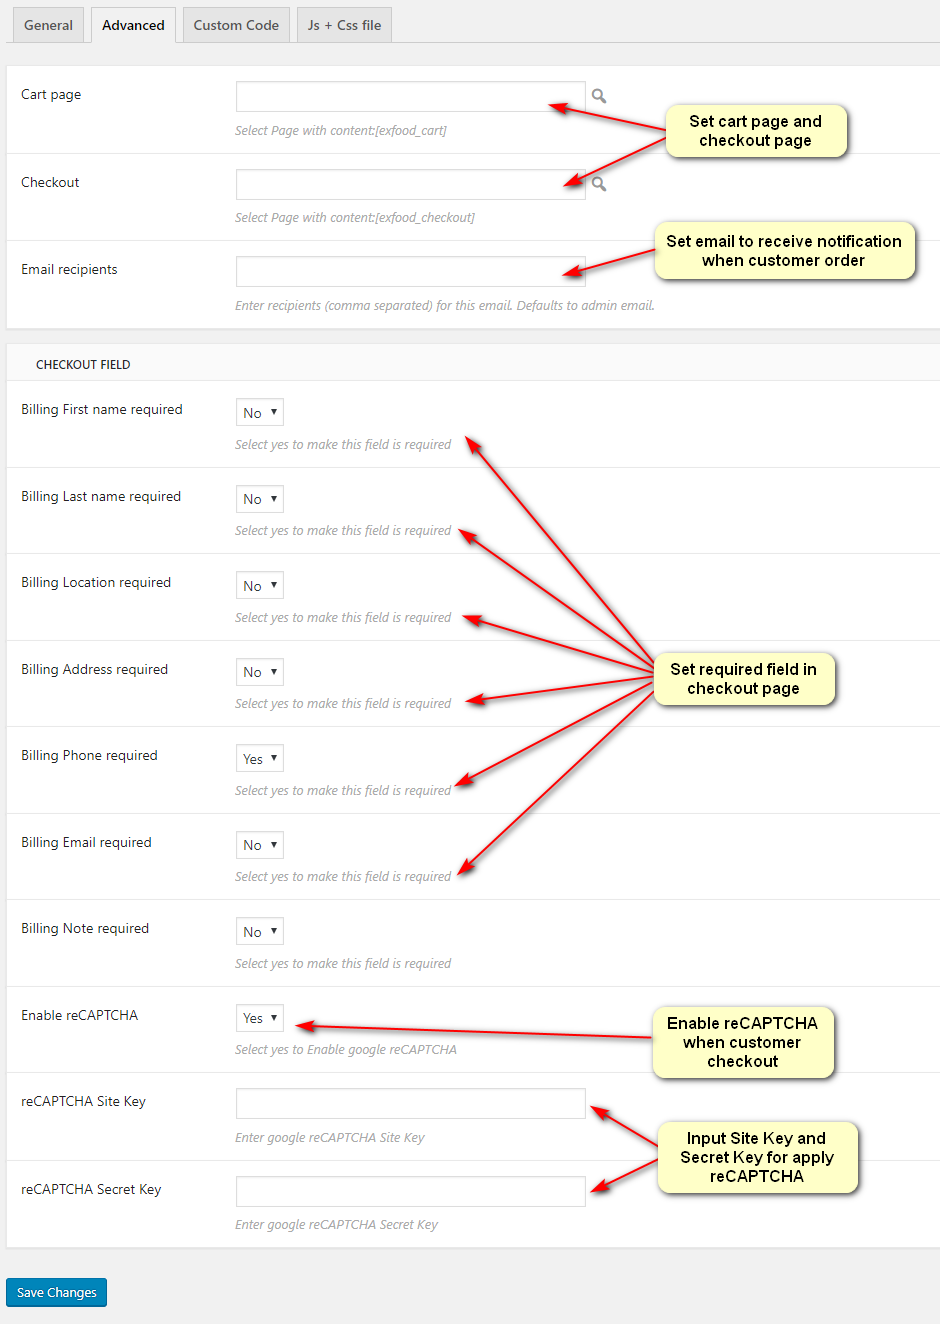 From ver 2.1, We added a few options
- Add new option select Disable for each checkout field. If you choice any field is disable, that field will be disapeared from check out form page
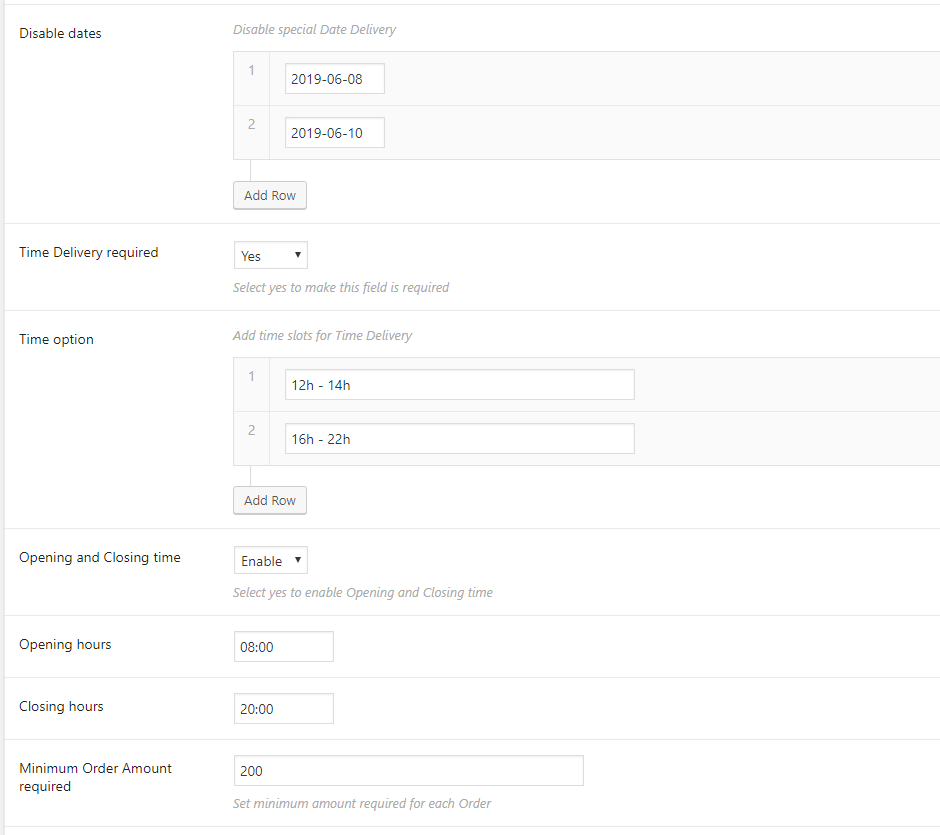
- Add Disable dates : disable any special date, customer can not order on these days
- Add Opening and Closing time : When this option Enable, Customer only can order between open and close time(Note that: Open and closing time depend on your location timezone WordPress Dashboard -> Setting -> General -> Timezone)
- Minimum Order Amount required : Customer only can checkout when order from minimum amount
Bellow is example for Disable date 8 June and 10 June, Enable Open and close time from 08:00 to 20:00, minimum amount order is 200$
 2. Display
 3. How to create recaptcha(only support recaptcha v2)
Go to https://www.google.com/recaptcha/admin/create to set up recaptcha
Translation
The plugin is translation ready, please follow the steps bellow:
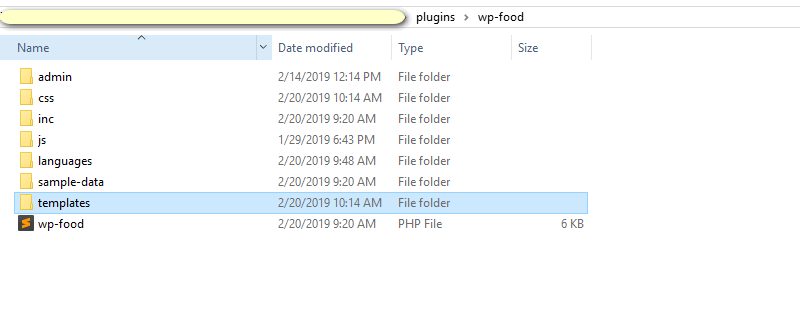
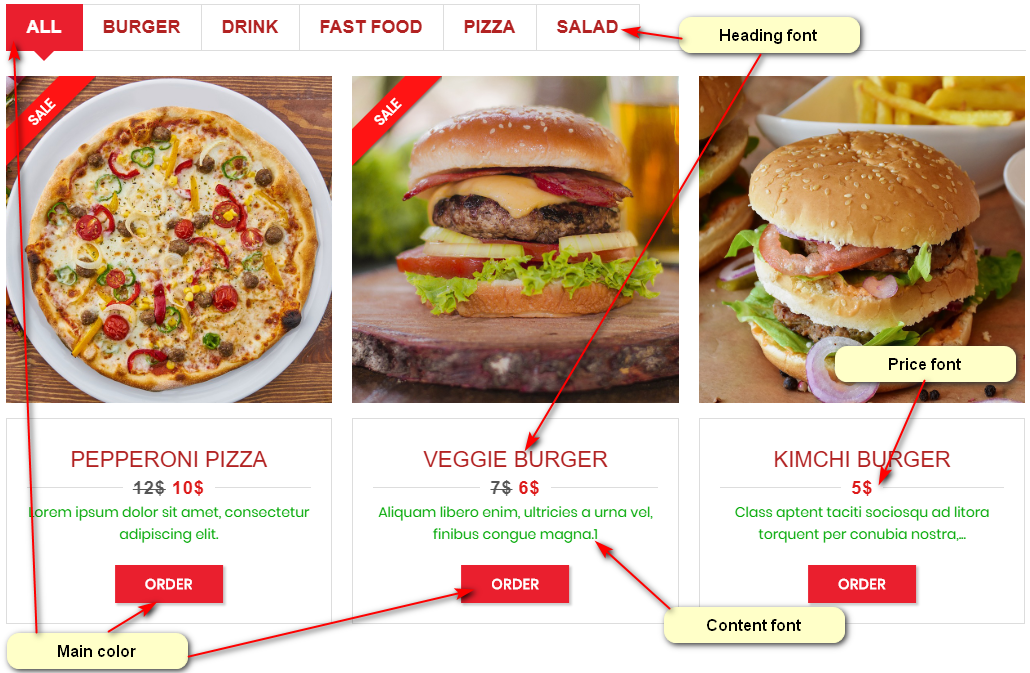
Customize
To edit template of food element you just copy folder “templates” in the folder “plugins/wp-food/” to your theme folder and change name to “wp-food” and you can customise it as you want